

Create Swimlane in Activity Diagram using Open API
 In UML activity diagram the swimlane is a collection of partitions which allows user to group the actions with common characteristics together. The swimlane can have partitions in multi dimensions. In this article we will show you how to create swimlane in activity diagram using Visual Paradigm Open API.
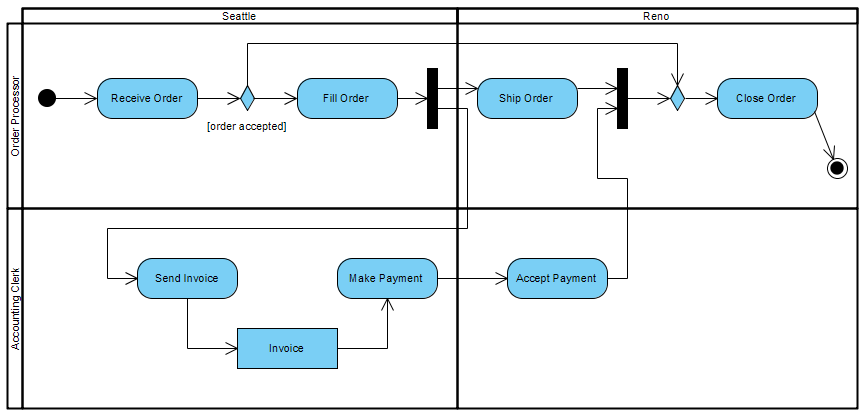
Activity diagram with swimlane
This is the activity diagram we are going to create. It contain a swimlane with 2 dimension partitions and elements organized across the partitions.
Create Blank Activity Diagram
Let’s start by create a blank diagram. We can use DiagramManager.createDiagram operation to create a blank new diagram.
// Create activity diagram
DiagramManager diagramManager = ApplicationManager.instance().getDiagramManager();
IActivityDiagramUIModel diagram = (IActivityDiagramUIModel) diagramManager.createDiagram(IDiagramTypeConstants.DIAGRAM_TYPE_ACTIVITY_DIAGRAM);
Create Model and View for Swimlane
When the diagram is ready we can start to create the swimlane (IActivitySwimlane2).
// Create swimlane model
IActivitySwimlane2 swimlane = IModelElementFactory.instance().createActivitySwimlane2();
// Create the view of swimlane
IActivitySwimlane2NewUIModel swimlaneShape = (IActivitySwimlane2NewUIModel) diagramManager.createDiagramElement(diagram, swimlane);
// Specify the size and location of the swimlane
swimlaneShape.setBounds(50, 80, 850, 400);
// Trigger the automatic calculate caption position
swimlaneShape.setRequestResetCaption(true);
Create Partition for Swimlane
After create the swimlane we can start create partitions (IActivityPartition) on the swimlane. First we have to create the partition model.
// Create partitions for swimlane
IActivityPartition partitionSeattle = IModelElementFactory.instance().createActivityPartition();
partitionSeattle.setName("Seattle");
// Specify it is a vertical partition
swimlane.addVerticalPartition(partitionSeattle);
// Add the partition model as child model of swimlane
swimlane.addChild(partitionSeattle);
After that we create the view of the partition shape, which is the IActivityPartitionHeaderUIModel.
// Create vertical partition header shape
IActivityPartitionHeaderUIModel partitionSeattleHeader = (IActivityPartitionHeaderUIModel) diagramManager.createDiagramElement(diagram, partitionSeattle);
// Specify the same as a vertical partition
partitionSeattleHeader.setHorizontal(false);
// Making the swimlane shape and partition header shape reference to each other
partitionSeattleHeader.setSwimlane(swimlaneShape);
swimlaneShape.addChild(partitionSeattleHeader);
// Specify the location of the partition header. Make sure it is within the bounds of the swimlane
partitionSeattleHeader.setBounds(50+PARTITION_HEADER_HEIGHT, 80, 450-PARTITION_HEADER_HEIGHT, PARTITION_HEADER_HEIGHT);
// Trigger the automatic calculate caption position
partitionSeattleHeader.setRequestResetCaption(true);
Try it yourself to create the other 3 partitions. When the partitions are created we can associate them to the view of swimlane.
// Associate the ID of partition header to the vertical and horizontal partition
swimlaneShape.setVerticalPartitionIds(new String[] {partitionSeattleHeader.getId(), partitionRenoHeader.getId()});
swimlaneShape.setHorizontalPartitionIds(new String[] {partitionOrderProcessorHeader.getId(), partitionAccountingCleakHeader.getId()});
Create Compartment for partitions
Next we have to create the compartments (IActivitySwimlane2CompartmentUIModel) for the partition. You can imagine it is the cell which joining the partitions.
// Create compartment shape between Seattle partition and Order Processor partition
IActivitySwimlane2CompartmentUIModel cellSeattleOrderProcessor = (IActivitySwimlane2CompartmentUIModel) diagramManager.createDiagramElement(diagram, IShapeTypeConstants.SHAPE_TYPE_ACTIVITY_SWIMLANE2_COMPARTMENT);
// Specify the ID of the vertical and horizontal header
cellSeattleOrderProcessor.setVerticalPartitionId(partitionSeattleHeader.getId());
cellSeattleOrderProcessor.setHorizontalPartitionId(partitionOrderProcessorHeader.getId());
// Specify the bounds of the compartment
cellSeattleOrderProcessor.setBounds(50+PARTITION_HEADER_HEIGHT, 80, 450-PARTITION_HEADER_HEIGHT, 200);
// Add the compartment shape as child of swimlane shape
swimlaneShape.addChild(cellSeattleOrderProcessor);
Create Model Elements and Views in the Compartment
When the compartment is ready we can start create model elements and views into it. You may refer to Create Activity Diagram using Open API for details about it. One thing you need to take care is even the elements is located inside the partition compartment, you still need to add the model element as the child of the swimlane.
// Create Initial Node Model
IInitialNode initialNode = IModelElementFactory.instance().createInitialNode();
// Add the initial node model as child of the swimlane
swimlane.addChild(initialNode);
// Specify the partition(s) which containing the initial node
partitionOrderProcessor.addContainedElement(initialNode);
partitionSeattle.addContainedElement(initialNode);
// Create Initial Node Shape
IInitialNodeUIModel initialNodeShape = (IInitialNodeUIModel) diagramManager.createDiagramElement(diagram, initialNode);
// Specify the bounds of the initial node on diagram
initialNodeShape.setBounds(80, 160, 20, 20);
// Add the initial node shape to the child of the compartment
cellSeattleOrderProcessor.addChild(initialNodeShape);
After creating the model elements we can move on to create the control flows and object flows between the elements. Again, the control flow and object flow will also need to add to swimlane as its children.
// Create control flow model between initial node and Receive Order action
IControlFlow flowInitialReceiveOrder = IModelElementFactory.instance().createControlFlow();
// Add the control flow model as child to swimlane
swimlane.addChild(flowInitialReceiveOrder);
// Specify the from/to element
flowInitialReceiveOrder.setFrom(initialNode);
flowInitialReceiveOrder.setTo(actionReceiveOrder);
// CReate control flow connector on diagram.
diagramManager.createConnector(diagram, flowInitialReceiveOrder, initialNodeShape, actionShapeReceiveOrder, null);
Associate Compartment to Swimlane’s View
Finally we associate the compartment to the view of the swimlane.
// Associate the compartment to swimlane shape
swimlaneShape.setCompartmentIds(new String[] {
    cellSeattleOrderProcessor.getId(),
    cellRenoOrderProcessor.getId(),
    cellSeattleAccountingCleark.getId(),
    cellRenoAccountingCleark.getId()
});
Show Up the Diagram
When everything is ready we can show up the diagram.
// Bring up the diagram
diagramManager.openDiagram(diagram);
Sample Plugin
The sample plugin attached in this article demonstrate how to create swimlane in activity diagram using Open API. After you deploy the plugin into Visual Paradigm you can then click the plugin button in the application toolbar to trigger it.
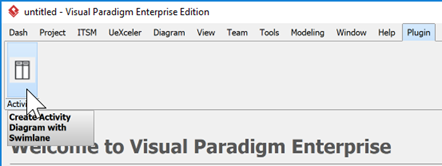
Trigger sample plugin
Download Sample Plugin
You can click this link to download the sample plugin.
Related Know-how |
Related Link |
Leave a Reply
Want to join the discussion?Feel free to contribute!