

How to migrate Teamwork Server from Built-in Authentication to Active Directory Authentication
Active Directory is a directory service implemented by Microsoft. It enhanced the security of your network by providing centralized user account and security policy management. Besides, it also provides authentication and authorization mechanisms for various services which compliant to it. You can configure your Teamwork Server to work with your Active Directory for user access and authentication control. In this article we will teach you how to migrate your existing Teamwork Server from using the build-in authentication to Active Directory authentication.
Before we start
The migration process involves 7 steps, they are:
- Configure Active Directory for Teamwork Server
- Ask all user commit their changes and remove their local projects
- Backup Teamwork Server
- Rename all existing Teamwork Server users
- Change Teamwork Server to Active Directory authentication
- Assign users to projects
- Ask all user re-checkout projects from server
To avoid missing out any steps throughout the process, please download the following checklist and use it during the migration process.
Checklist for migrate Teamwork Server to Active Directory authentication (MS Word)
Checklist for migrate Teamwork Server to Active Directory authentication (PDF)
Now let’s start the migration process by configure your Active Directory for Teamwork Server.
1. Configure Active Directory for Teamwork Server
The first thing we need to do is to make the Active Directory ready for Teamwork Server. This involve of defining Teamwork Server specific attributes as well as their values to your Active Directory. Instead of define the attributes for each user, you can define them under the schema and associate them to group class so that all users can inherit from it.
Please reference to the Step 2 – 4 of Visual Paradigm Teamwork Server Active Directory Authentication (User Group) in Teamwork Server User’s Guide about how to define the schema attributes.
After defining the attributes and restarted the Active Directory Domain Service, we can then specify permissions for each user. To specify the permissions:
- Open Active Directory Administrator Center.
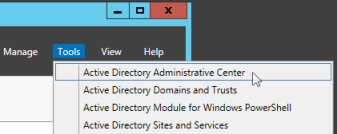
Open Active Directory Administrative Center
- Right click on the user which will access Teamwork Server, and select Properties from popup menu.
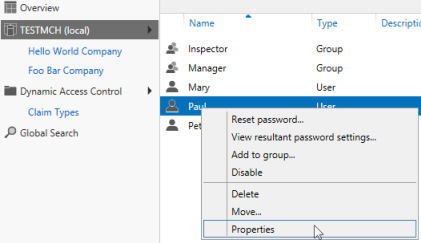
Open properties of the user who need to access Teamwork Server
- Select the Extensions from the side menu.
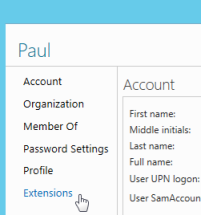
Select Extensions from side menu
- Switch to Attribute Editor.
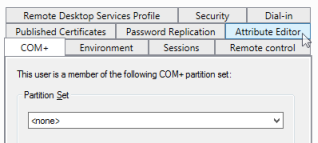
Switch to Attribute Editor tab
- Double click on Teamwork Server related attributes (i.e. isvptsuser, create project, etc…), and change the value to True or False.
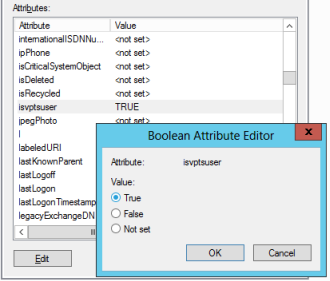
Edit attribute’s value
- Repeat the steps 2 – 5 for all of your Teamwork Server user.
Now your Active Directory is ready and we can move on to the next phrase.
2. Ask all user commit their changes and remove their local projects
Visual Paradigm’s client software (VP-UML, Logizina & Agilian) will organize teamwork projects in associate with the user account and the server. Since changing server authentication method will require user to change their login ID, it will break the association between the server and the projects user checked out locally. Therefore it is necessary that user need to re-checkout all the projects from server after changing the authentication method. To avoid any loss of the modification user had been done, it is recommend that all users do a full commit on their projects to the server before making the change. This helps to guarantee user won’t missed out their modifications and can make sure everyone can start on the same page after the change.
Perform full commit on all local modifications to server.
After users committed their projects they will then have to remove the projects from their workspace so that they can re-check later on with Active Directory user account. To remove the projects:
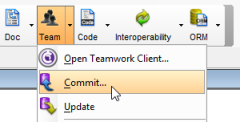
- Open Teamwork Client.
Open Teamwork Client
- Press the Manage Project button.
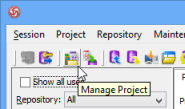
Manage Project
- Select the projects under Projects list, and press the < button to remove them.
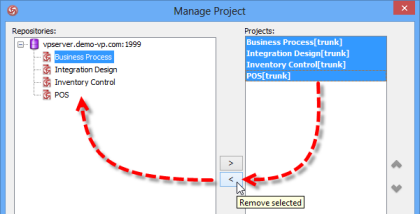
Remove local projects
- Right click on the repository root note and select Remove Repository Location.
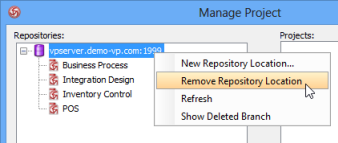
Remove repository from server
- Click OK to close the Manage Project dialog.
- Click Logout button to logout from Teamwork Server
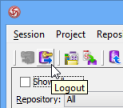
Logout from server
- Close Teamwork Client and shutdown VP application.
After that the projects will be removed from user’s workspace, and we can move on the backup the server.
3. Backup Teamwork Server
To protect you from losing your valuable works, it is recommended to backup the server from time-to-time. Doing backup before making change on authentication method is significantly important since it can create a clean snapshot of your projects as all users had committed their works. This is very helpful in case you need to rollback the environment after the change. You can follow the article below on how to backup your server.
http://knowhow.visual-paradigm.com/technical-support/backup-vpserver/
Once the server is backed up, we can then move on to make the real change on your Teamwork Server.
4. Rename all existing Teamwork Server user
Since Teamwork Server do not allow users having duplicated name, in case your existing Teamwork Server user is having same name as in Active Directory then it will caused issue. To avoid this problem it is recommend to rename all existing Teamwork Server users and make sure they won’t duplicated the name to the Activity Directory. To rename the users:
- Startup VP Server again.
- Open the browser and go to your VP Server.
Access to VP Server via browser
- Click on the Manage at the top right hand corner.
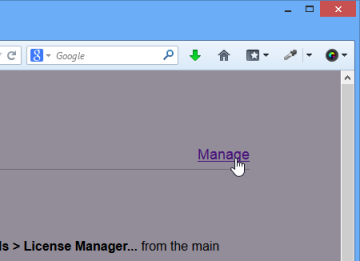
Manage server
- Login to server as the administrator with login name “Admin”.
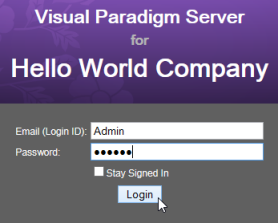
Login to server as administrator
- Select Users under Teamwork Module.
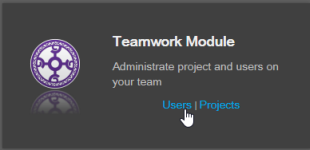
Select Users under Teamwork Module
- Select the user from the list to rename it.
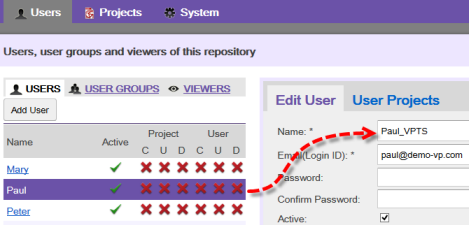
Rename user to avoid duplicated user name with Active Directory
- Press Save button to proceed.
- Repeat steps for all Teamwork Server users on your server.
Next we are going to change the authentication method of the server.
5. Change Teamwork Server to Active Directory authentication
Now everything is ready and we are about to change Teamwork Server from built-in authentication to Active Directory authentication. Please reference to Step 7 of Visual Paradigm Teamwork Server Active Directory Authentication (User Group) in Teamwork Server User’s Guide regarding how to configure the server configuration.
Now the users had been pulled form Activity Directory to Teamwork Server, and we can go to assign users to the projects.
6. Assign users to projects
After switch Teamwork Server to Active Directory authentication you will have to re-assign the users to your projects. To assign users to projects:
- Select Projects under Teamwork Module.
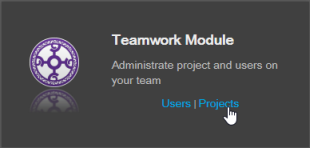
Select Projects under Teamwork Module
- Select the project and press Edit button under Project Users.
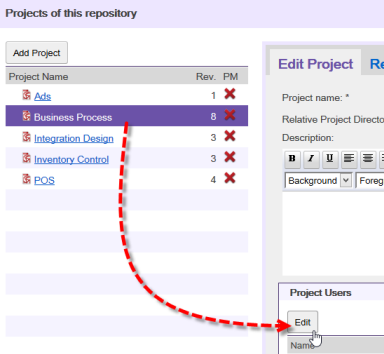
Edit project users
- Remove the original Teamwork Server user form project, and assign the Active Directory user to project.
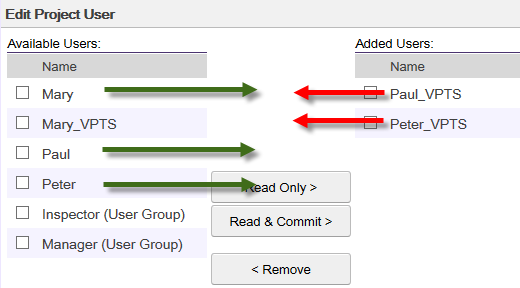
Remove original Teamwork Server user from Project, and add Active Directory User to project
- Press Confirm to commit.
- Repeat the steps for all projects on your server
Now everything is ready and we can move on to the last step.
7. Ask all user re-checkout projects from server
Once the server is changed to Active Directory authentication users can then login to server with their Active Directory account, and re-checkout the projects from server. To do this:
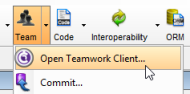
- Open Teamwork Client.
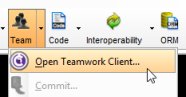
Open Teamwork Client
- Login to Teamwork Server with Active Directory user account.
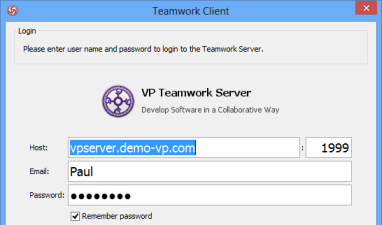
Login to Teamwork Server with Active Directory user account
- Press the Manage Project button.
Manage Project
- Select the project you would like to access, and click > button to add them to the Projects list. Click OK to close the Manage Project dialog.
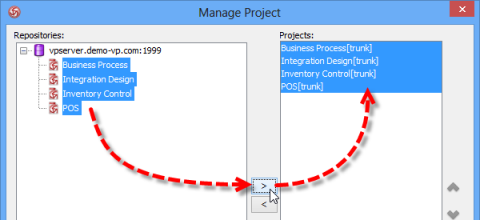
Add projects back to Teamwork Client
- Select the project in Teamwork Client, then press the Checkout button checkout from server.
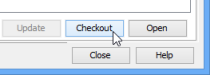
Re-checkout project from server
After that user can work with their teamwork project just as usual.
Related Know-how
- How to Reset Admin Password for VP Server
- How to Setup Microsoft SQL Server for VP Server
- How to Adjust Default PermGen Memory Setting for VP Server
Leave a Reply
Want to join the discussion?Feel free to contribute!