

Share Models between Class Diagram and Sequence Diagram
A class diagram shows a set of classes, interfaces and their relationships and illustrates the static design view of a system, while a sequence diagram shows the sequence of actions that occurs in a system and illustrates the dynamic view of a system. With Visual Paradigm Desktop, you can easily share the models between class diagram and sequence diagram. The changes that made in the sequence diagram can be automatically added to the class diagram as well and vice versa.
-
Create a class diagram by one of these 3 methods listed below:
Select System Design> UML > Class Diagram from the welcome page.
 Select Diagram > New > Class Diagram from the toolbar.

Right click on the Class Diagram on the Diagram Navigator and select New Class Diagram from the pop-up menu.

-
Draw two classes by selecting the Class icon on the diagram toolbar and clicking it on the diagram. Rename the classes as OrderController and Order respectively.

-
Create operations in Order class by right-clicking the class and select Add > Operation.

-
Operations starting with the + sign are public operations. It can be called by all classes. Whilst the ones starting with the – sign are private operations. It can be called by its belonging class only.

-
Create an association link between the two classes by selecting the Association icon on the diagram toolbar and dragging it from OrderController class to the Order class.

-
Create a sequence diagram by one of these 3 methods listed below:
Select System Design> UML > Sequence Diagram from the welcome page.

Select Diagram > New > Sequence Diagram from the toolbar.

Right click on the Sequence Diagram on the Diagram Navigator and select New Sequence Diagram from the pop-up menu.

-
Drag the OrderController class and Order class from the Diagram Navigator under the Class Diagram tree and drop them on the sequence diagram. Choose Lifeline from the pop-up menu. Then Ordercontroller lifeline and Order lifeline will be created subsequently.

-
Add an actor to the sequence diagram by choosing the Actor icon on the diagram toolbar and then click on the diagram. Rename the actor as Clerk.

-
Create a message from actor to the lifeline by choosing on the Message icon on the diagram toolbar and dragging it from Clerk actor to Order lifeline. Repeat the same action for creating a message between OrderController and Order.

-
Operations of the receiver of the message are listed for choosing. Note that only public operations can be shown since the accessibility of private operations are limited to only its belonging class.

-
Create a messages setOrderNumber between OrderController and Order.

-
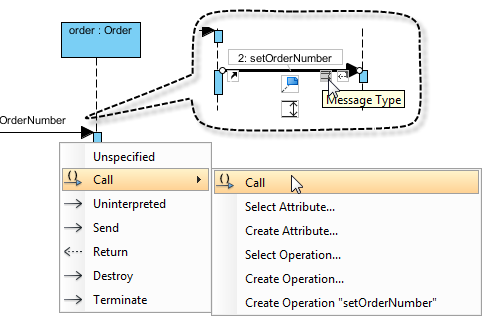
To set Call type for a message, move the mouse over the target message, click the Message Type resource icon and select Call > Call from the pop-up menu.
-
To select an operation for the Call type message, right click on the message and select Select Operation > Create Operation “setOrderNumber”from the pop-up menu.

-
The new operation, setOrderNumber() is automatically created and the change is reflected on the class diagram too.

-
In case parameter is needed to be passed into the operation when it is called, make changes to its signature.

-
The signature in the class diagram will also be changed as a result.

Leave a Reply
Want to join the discussion?Feel free to contribute!