

Create Component Diagram using Open API
 Component Diagram in Unified Modeling Language is helps to model the relationships between various components in a system. It helps to illustrate the structure of arbitrarily complex system. Instead of creating component diagram manually, you can also create it programmatically using Open API. In this article we will show you how to create the component diagram with Visual Paradigm’s Open API.
This is the component diagram which we are going to create. The diagram consists of 7 components, 9 ports, 3 interfaces and 9 relationships. Let’s start with create a blank component diagram.
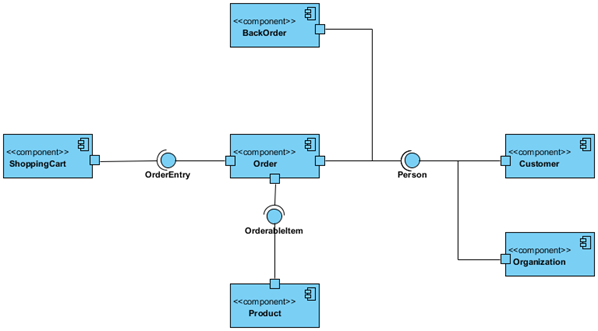
Component Diagram which we are going to create via Open API
Create Blank Component Diagram
Let’s start by create a blank diagram. We can use the DiagramManager.createDiagram operation to create a blank new diagram.
DiagramManager diagramManager = ApplicationManager.instance().getDiagramManager();
IComponentDiagramUIModel diagram = (IComponentDiagramUIModel) diagramManager.createDiagram(DiagramManager.DIAGRAM_TYPE_COMPONENT_DIAGRAM);
Creating Component
Once the diagram is created, we can then move on to create the diagram element and model elements. Our diagram include couple of components, ports and interfaces. Let’s start by create the components. To create the components.
// create the component model
IComponent compOrder = IModelElementFactory.instance().createComponent();
compOrder.setName("Order");
// create component shape on diagram
IComponentUIModel compOrderShape = (IComponentUIModel) diagramManager.createDiagramElement(diagram, compOrder);
// specify its location & dimension on diagram
compOrderShape.setBounds(358, 211, 115, 57);
// set to automatic calculate the initial caption position
compOrderShape.setRequestResetCaption(true);
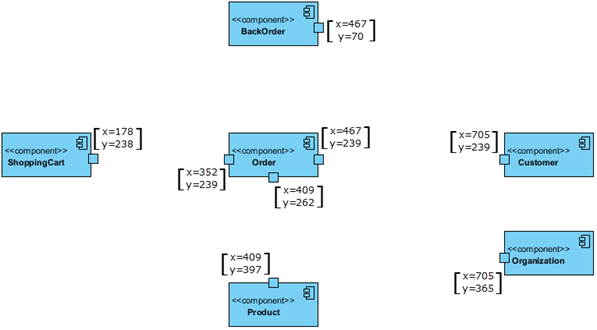
Now it’s your turn, try out to create the reset of the components.

Create components according to the size and position as shown in the image
Creating Ports on Component
After create the components we can then start to create the ports on individual components. To create the ports:
// create the port on Order component
// this port will used to create realization to OrderEntry interface
IPort portOrderOrderEntry = compOrder.createPort();
// create the port shape on diagram
IPortUIModel portOrderOrderEntryShape = (IPortUIModel) diagramManager.createDiagramElement(diagram, portOrderOrderEntry);
// specify its location & dimension on diagram
portOrderOrderEntryShape.setBounds(352, 239, 12, 12);
// add the port to become the child of the Order component
compOrderShape.addChild(portOrderOrderEntryShape);
Again, now it’s your turn to create other ports on different components.
Create ports according to the size and position as shown in the image
Creating Interface
We got 3 interfaces on our diagram, the OrderEntry, OrderableItem and Person. Now let’s create them. In Visual Paradigm, the interface on Component Diagram is called a StructuredInterface, which basically is a class. To create it:
// create the OrderEntry class
IClass orderEntry = IModelElementFactory.instance().createClass();
orderEntry.setName("OrderEntry");
// assign it with Interface stereotype
orderEntry.addStereotype("Interface");
// create structured interface shape
IStructuredInterfaceUIModel orderEntryShape = (IStructuredInterfaceUIModel) diagramManager.createDiagramElement(diagram, IShapeTypeConstants.SHAPE_TYPE_STRUCTURED_INTERFACE);
// assign the class as the model element of the structured interface shape
orderEntryShape.setModelElement(orderEntry);
// specify its location & dimension on diagram
orderEntryShape.setBounds(269, 235, 20, 20);
// set to automatic calculate the initial caption position
orderEntryShape.setRequestResetCaption(true);
Try follow the above to create 2 more interfaces, the OrderableItem and Person.
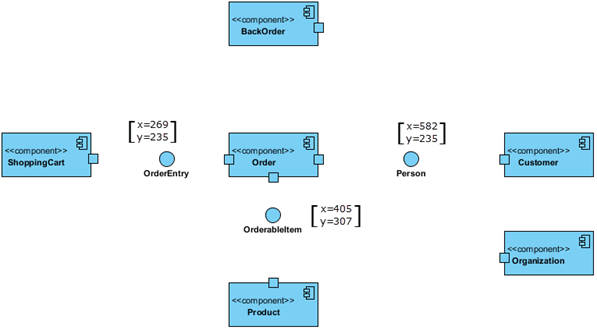
Create interface according to the size and position as shown in the image
Creating Realization and Usage
Finally we come to create the relationships. In the component diagram we have the provided and required interface. The provided interface basically is a realization relationship to the interface class, and the required interface is the usage relationship to the interface class. To create the provided interface from Order to OrderEntry:
// create realization relationship model
IRealization realizationOrderOrderEntry = IModelElementFactory.instance().createRealization();
// specify the from end as the port on the Order component
realizationOrderOrderEntry.setFrom(portOrderOrderEntry);
// specify the to end as the OrderEntry interface class
realizationOrderOrderEntry.setTo(orderEntry);
// create the connector shape on diagram,
// with points as null since it is a straight connector
diagramManager.createConnector(diagram, realizationOrderOrderEntry, orderEntryShape, portOrderOrderEntryShape, null);
And to create the required interface from ShoppingCart to OrderEntry:
// create usage relationship model
IUsage usageShoppingCartOrderEntry = IModelElementFactory.instance().createUsage();
// specify the from end as port on the ShoppingCart
usageShoppingCartOrderEntry.setFrom(portShoppingCardOrderEntry);
// specify the to end as the OrderEntery
usageShoppingCartOrderEntry.setTo(orderEntry);
// create the connector shape on diagram
diagramManager.createConnector(diagram, usageShoppingCartOrderEntry, portShoppingCardOrderEntryShape, orderEntryShape, null);
Once again, follow the above to create the other relationships on the diagram.
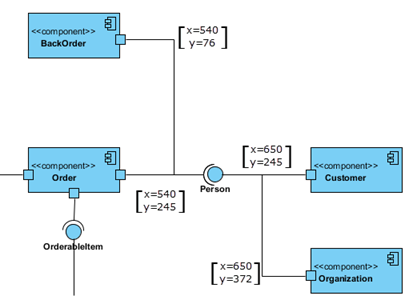
Position of turning point of the relationships
Show up the diagram
When everything is ready we can show up the diagram.
diagramManager.openDiagram(diagram);
Sample Plugin
The sample plugin attached in this article demonstrate how to create component diagram using Open API. After you deploy the plugin into Visual Paradigm, you can then click the plugin button in the application toolbar to trigger it.
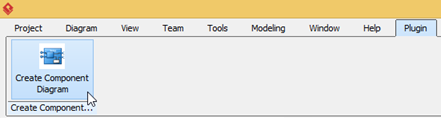
Trigger sample plugin
Download Sample Plugin
You can click this link to download the sample plugin.
Related Know-how |
Related Link |
Leave a Reply
Want to join the discussion?Feel free to contribute!