How to Show All Levels of Preview Shapes
When one shape is nested inside another, such as sub-process, its content (shapes) inside would show along with what’s outside in diagram at the same time. For example, if a sub-process is not composed of any other sub-processes, it will appear in business process diagram, with the shapes (e.g. tasks) that make it up inside itself. However, the viewing works up to one level of nesting only by default.
What happens to preview shapes if you are nesting with multiple levels of shapes?
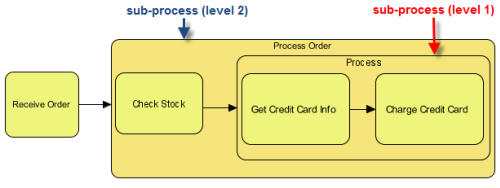
If the nesting goes beyond one level (e.g. a sub-process made up of another sub-process), the preview shapes won’t be seen inside the sub-process shape itself. It is defaulted this way to trade-off for performance.
However, as needs arise, you might need to show preview shapes inside the sub-processes (regardless of how many levels of nesting there are). To meet that need, VP-UML offers an option to show all levels of preview shapes (as shown below).
Enabling the option to show all levels of preview shapes is not “free” though. As mentioned earlier, there might be an impact on performance in displaying diagram.
Please also note that this setting will apply to all shapes with preview image, such as those in Diagram Overview.
This tutorial will show you how to enable the option in VP-UML as an example.
Steps to Show All Levels of Preview Shapes
- From the main menu, select Tools > Application Options…
- In the Application Options window, select Diagramming on the left hand side.
- Open the Shape tab.
- Check Show unlimited level in preview shapes. Note that this may slow down the diagram rendering.
- Click OK.
- Close and reopen the diagrams involved. You should now see the preview content in all sub-processes.
Steps to Create the Sample Business Process Diagrams Above
In this section, we will walk you through how to create the business process diagrams that we used in the example earlier in this tutorial.
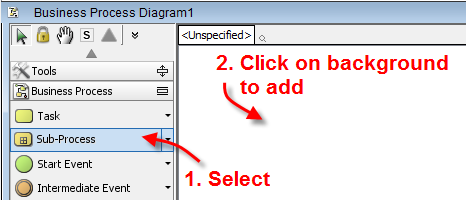
1. In a new business process diagram, add a Sub-Process shape.
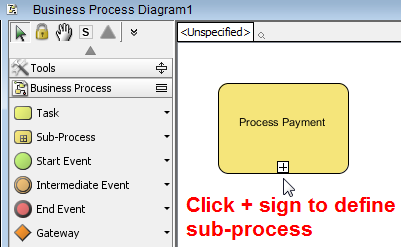
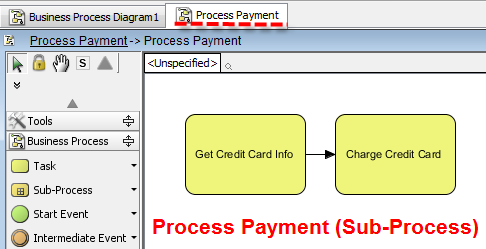
2. Name the new sub-process Process Payment.
3. Define Process Payment (sub-process) to contain 2 tasks, Get Credit Card Info and Charge Credit Card.
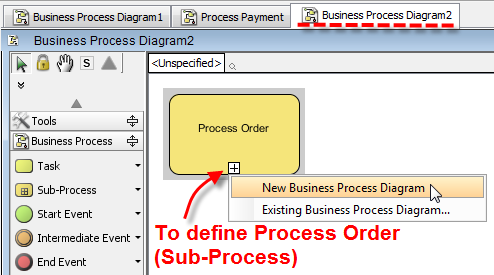
4. Add a new business process diagram (e.g. Business Process Diagram 2). In it, add a new sub-process called Process Order. To define it, click the + sign to select New Business Process Diagram.
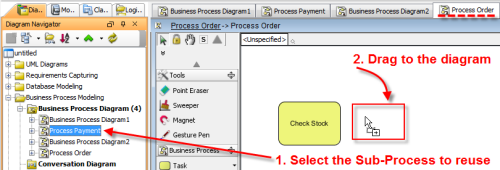
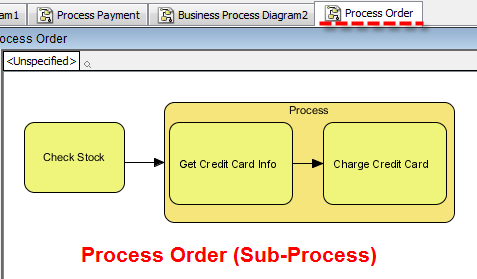
5. In defining Process Order (sub-process), add a task called Check Stock.
Reuse/Nest with Process Payment (sub-process) by selecting it in Diagram Navigator and dragging it onto the diagram.
6. When you click to view Business Process Diagram 2, the preview shapes would not appear (as expected from having disabling the option to show all levels of preview shapes by default).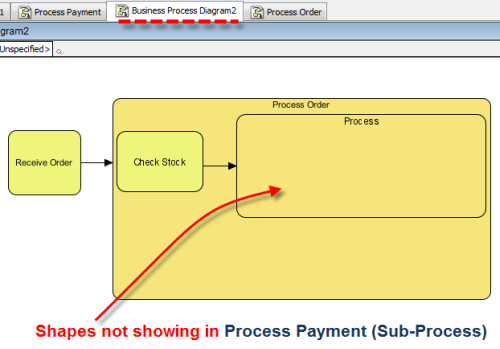
To enable the option, refer back to the beginning of the tutorial on instructions.



Leave a Reply
Want to join the discussion?Feel free to contribute!