Create a BPMN Conversation Diagram
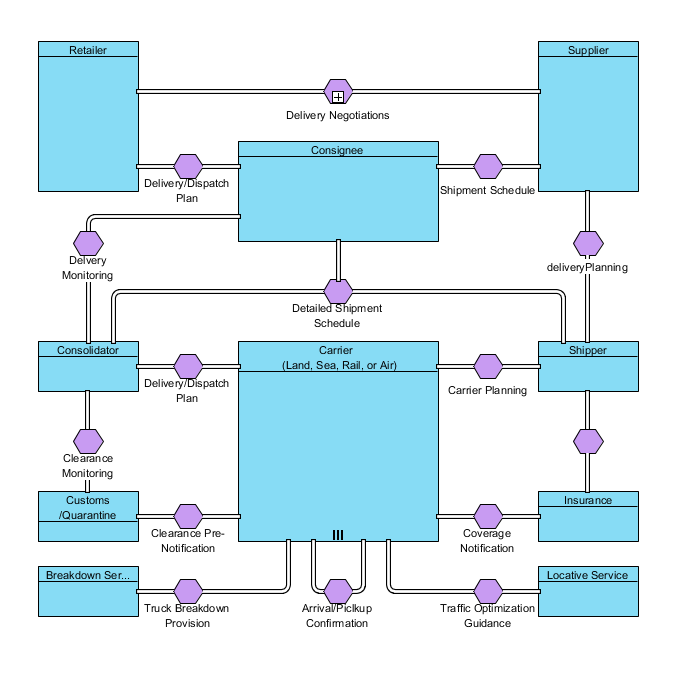
A conversation diagram is used to shows message exchange between pools. This article will demonstrate how to create a conversation diagram with BPMN using Open API.

The conversation diagram will be created
Create Blank Conversation Diagram
First use DiagramManager.createDiagram to create a blank conversation diagram
//Create Blank BPMN Conversation Diagram
DiagramManager diagramManager = ApplicationManager.instance().getDiagramManager();
IConversationDiagramUIModel bpmnCon = (IConversationDiagramUIModel) diagramManager.createDiagram(IDiagramTypeConstants.DIAGRAM_TYPE_CONVERSATION_DIAGRAM);
bpmnCon.setName("Sample BPMN Conversation Diagram");
Create Participants (Pools)
We are ready to create pools once the diagram is created. A pool can be created by the class IModelElementFactory. Remember to set the orientation of the pool using the method IBPPoolUIModel.setOrientation(), as pools are pre-set to be rotated by 90 degrees anticlockwise. You will also need to turn Auto Stretch off avoiding the poll resizing according to the diagram height.
//Create Participant(Pool)
IBPPool retailer = IModelElementFactory.instance().createBPPool();
retailer.setName("Retailer");
//Create the Pool on the diagram
IBPPoolUIModel shapeRetailer = (IBPPoolUIModel) diagramManager.createDiagramElement(bpmnCon, retailer);
shapeRetailer.setBounds(100, 100, 100, 150);
//You will need to set the orientation or the pool will be 90 degree rotated
shapeRetailer.setOrientation(IBPPoolUIModel.VERTICAL);
//Turn auto stretch off
shapeRetailer.setAutoStretch(IBPPoolUIModel.AUTO_STRETCH_OFF);
If a pool has a participant, you will also have to create its participant and corresponding multiplicity.
//If the pool has participant, first set it up like a normal pool...
IBPPool carrier = IModelElementFactory.instance().createBPPool();
carrier.setName("Carrier \n (Land, Sea, Rail, or Air)");
IBPParticipant carrierParticipant = IModelElementFactory.instance().createBPParticipant();
//...Then set up the participant and multiplicity
carrierParticipant.setName("Carrier Participant");
IBPParticipantMultiplicity carrierParticipantMultiplicity = IModelElementFactory.instance().createBPParticipantMultiplicity();
carrierParticipantMultiplicity.setName("Carrier Participant Multiplicity");
carrierParticipant.setMultiplicity(carrierParticipantMultiplicity);
carrier.setParticipant(carrierParticipant);
//You can then visualize the pool
IBPPoolUIModel shapeCarrier = (IBPPoolUIModel) diagramManager.createDiagramElement(bpmnCon, carrier);
shapeCarrier.setBounds(300, 400, 200, 200);
shapeCarrier.setOrientation(1);
shapeCarrier.setAutoStretch(IBPPoolUIModel.AUTO_STRETCH_OFF);
shapeCarrier.resetCaption();
Create Conversation Links and Sub Conversation Links
When all pools are created, we are free to create conversation links and sub conversation links. First the conversation link will be created, the corresponding conversation/sub-conversation will then be created.
Here is how you can create a conversation link:
//Create a conversation link
 IConversationLink consigneeToRetailer = IModelElementFactory.instance().createConversationLink();
 //This link is connecting from the consignee pool...
 consigneeToRetailer.setFrom(consignee);
 //...to the retailer pool
 consigneeToRetailer.setTo(retailer);
 //create the connector on the diagram
 IConversationLinkUIModel shapeConsigneeToRetailer = (IConversationLinkUIModel) diagramManager.createConnector(bpmnCon, consigneeToRetailer, shapeConsignee, shapeRetailer, new Point[] {new Point(300,225), new Point (200,225)});

 //Create a conversation
 IConversationCommunication deliveryDispatchPlan1 = IModelElementFactory.instance().createConversationCommunication();
 deliveryDispatchPlan1.setConversationLink(consigneeToRetailer);
 deliveryDispatchPlan1.setName("Delivery/Dispatch \nPlan");
 //Create the conversation on the diagram
 IConversationCommunicationUIModel shapeDeliveryDispatchPlan1 = (IConversationCommunicationUIModel) diagramManager.createDiagramElement(bpmnCon, deliveryDispatchPlan1);
 shapeDeliveryDispatchPlan1.setBounds(235, 213, 30, 24);
 shapeDeliveryDispatchPlan1.resetCaption();
 //Call to re-calculate caption position when render the diagram
 shapeConsigneeToRetailer.addChild(shapeDeliveryDispatchPlan1);
And a sub conversation link:
//Create conversation link
IConversationLink retailerToSupplier = IModelElementFactory.instance().createConversationLink();
//This link is connecting from the retailer pool...
retailerToSupplier.setFrom(retailer);
//.. to the supplier pool
retailerToSupplier.setTo(supplier);
//create the connector on the diagram
IConversationLinkUIModel shapeRetailerToSupplier = (IConversationLinkUIModel) diagramManager.createConnector(bpmnCon, retailerToSupplier, shapeRetailer, shapeSupplier, new Point[] {new Point(200,150), new Point(600,150)});

//Create a sub conversation
ISubConversation deliveryNegotiation = IModelElementFactory.instance().createSubConversation();
deliveryNegotiation.setConversationLink(retailerToSupplier);
deliveryNegotiation.setName("Delivery Negotiations");
//Create the sub conversation on the diagram
ISubConversationUIModel shapeDeliveryNegotiation = (ISubConversationUIModel) diagramManager.createDiagramElement(bpmnCon, deliveryNegotiation);
shapeDeliveryNegotiation.setBounds(385,138,30,24);
shapeRetailerToSupplier.addChild(shapeDeliveryNegotiation);
//Call to re-calculate caption position when render the diagram
shapeDeliveryNegotiation.resetCaption();
Create Conversation Link that connects to more than two pools
If you have to create a link that connects more than two pools like the one shows below, we can first make a conversation link between two pools:
//If a conversation link is connecting to more than two pools, first make a conversation link between two of pools
IConversationLink consolidatorToShipper = IModelElementFactory.instance().createConversationLink();
consolidatorToShipper.setFrom(consolidator);
consolidatorToShipper.setTo(shipper);
IConversationLinkUIModel shapeConsolidatorToShipper = (IConversationLinkUIModel) diagramManager.createConnector(bpmnCon, consolidatorToShipper, shapeConsolidator, shapeShipper, new Point[] {new Point(175,400), new Point(175,350), new Point(625,350), new Point(625,400)});
//Then create a conversation
IConversationCommunication detailedShipmentSchedule = IModelElementFactory.instance().createConversationCommunication();
detailedShipmentSchedule.setConversationLink(consolidatorToShipper);
detailedShipmentSchedule.setName("Detailed Shipment \n Schedule");
IConversationCommunicationUIModel shapeDetailedShipmentSchedule = (IConversationCommunicationUIModel) diagramManager.createDiagramElement(bpmnCon, detailedShipmentSchedule);
shapeDetailedShipmentSchedule.setBounds(385, 338, 30, 24);		shapeConsolidatorToShipper.addChild(shapeDetailedShipmentSchedule);
shapeDetailedShipmentSchedule.resetCaption();
Then create a link between the remaining pools and the conversation.
//Finally, create a conversation link between the remaining pools and the conversation
IConversationLink consigneeToDetailShipmentSchedule = IModelElementFactory.instance().createConversationLink();
consigneeToDetailShipmentSchedule.setFrom(consignee);
consigneeToDetailShipmentSchedule.setTo(detailedShipmentSchedule);
diagramManager.createConnector(bpmnCon, consigneeToDetailShipmentSchedule, shapeConsignee, shapeDetailedShipmentSchedule, new Point[] {new Point(400,300), new Point(400,338)});
Show Up the Diagram
Finally we can show up the diagram.
//Show diagram
diagramManager.openDiagram(bpmnCon);
Sample Plugin
The sample plugin demonstrate how to create conversation diagram using Open API. After you deploy the plugin into Visual Paradigm you can then click the plugin button in the application toolbar to trigger it.

Download Sample Plugin
You can click this link to download the sample plugin
Related Know-how |
Related Link |


Leave a Reply
Want to join the discussion?Feel free to contribute!