Create SysML Requirement Diagram Using Open API
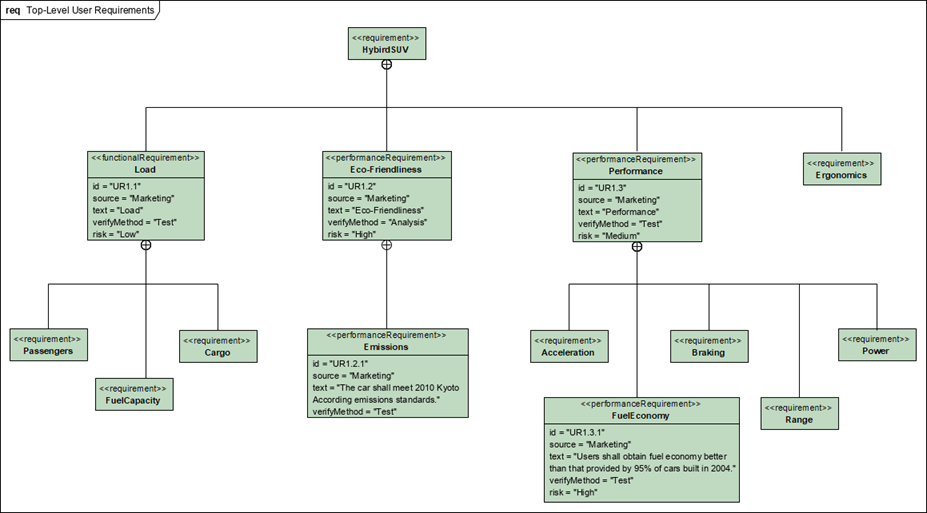
The Requirement Diagram is one of the SysML tool which provides a visual approach in representing and managing system requirements. This article will show you how to create Requirement Diagram using Open API.
Create Blank Diagram
First we use DiagramManager.createDiagram to create a blank Requirement Diagram.
// Create Requirement Diagram
DiagramManager diagramManager = ApplicationManager.instance().getDiagramManager();
IRequirementDiagramUIModel reqDiagram = (IRequirementDiagramUIModel) diagramManager.createDiagram(IDiagramTypeConstants.DIAGRAM_TYPE_REQUIREMENT_DIAGRAM);
reqDiagram.setName("Top-Level User Requirements");
Create Custom Requirement Types
Once the diagram is ready we start to create model elements. We first create the custom requirement types (which actually is IStereotypes). The IStereotype can be create using the ModelElementFactory.createStereotype() method. Once it being created we then specify its name using the setName method. We also need to specify the model type it applied to using the setBaseType method.
IModelElementFactory factory = IModelElementFactory.instance();

// Create functionalRequirement stereotype
IStereotype typeFunctionalRequirements = factory.createStereotype();
typeFunctionalRequirements.setName("functionalRequirement");
// Specify the stereotype is for IRequirement model type
typeFunctionalRequirements.setBaseType(IModelElementFactory.MODEL_TYPE_REQUIREMENT);
After create the stereotype then we define its properties (tagged values). To create tagged values we need to create the ITaggedValueDefinitionContainer using ModelElementFactory, then set the definitation to stereotype using IStereotpe.setTaggedValueDefinitions. After that we can create tagged value (ITaggedValueDefinition) from ITaggedValueDefinitionContainer.
// Define id, source & text as text-type tagged value
ITaggedValueDefinitionContainer tagsFunctionalRequirements = factory.createTaggedValueDefinitionContainer();
typeFunctionalRequirements.setTaggedValueDefinitions(tagsFunctionalRequirements);
ITaggedValueDefinition tagFunctionalRequirementsId = tagsFunctionalRequirements.createTaggedValueDefinition();
tagFunctionalRequirementsId.setName("id");
tagFunctionalRequirementsId.setType(ITaggedValueDefinition.TYPE_TEXT);
For each tagged value we need to specify its name and type using setName & setType method. For enumerated type we will also need to define its enumeration values using the setEnumerationValues method.
// Define verifyMehtod & risk as enum tagged value
ITaggedValueDefinition tagFunctionalRequirementsVerificationMethod = tagsFunctionalRequirements.createTaggedValueDefinition();
tagFunctionalRequirementsVerificationMethod.setName("verifyMethod");
tagFunctionalRequirementsVerificationMethod.setType(ITaggedValueDefinition.TYPE_ENUMERATION);
tagFunctionalRequirementsVerificationMethod.setEnumerationValues(new String[] {"Analysis", "Demonstration", "Inspection", "Test"});
Create Requirement Models
Now we can start create the requirement models (IRequirement). We first create the root level requirement and leave it with the default requirement type.
// Create root requirement model and specify its custom ID value
IRequirement reqHybridSUV = factory.createRequirement();
reqHybridSUV.setName("HybirdSUV");
reqHybridSUV.setUserID("UR1");
Next we create the other requirement and this time it is in the custom functionalRequirement type. We can use the removeStereotype method and specify “requirement” as parameter to remove the default requirement type, then use the addStereotype method to add our custom requirement type.
// Create Load requirement model
IRequirement reqLoad = factory.createRequirement();
reqLoad.setName("Load");
// Remove its default requirement type and assign the functionalRequirement to it
reqLoad.removeStereotype("requirement");
reqLoad.addStereotype(typeFunctionalRequirements);
After that we specify its requirement properties via tagged values. To do this we need to retrieve all tagged values from requirement and put into an array. After that walk through the array to see is its definition and name matched. If it matched then we assign value to it.
// Specify the values for tagged values associated with functionalRequirement
ITaggedValue[] reqLoadTags = reqLoad.getTaggedValues().toTaggedValueArray();
for (ITaggedValue tag : reqLoadTags) {
  if (typeFunctionalRequirements.getTaggedValueDefinitions().getTaggedValueDefinitionByName("id").equals(tag.getTagDefinition())) {
    tag.setValue("UR1.1");
  } else if (typeFunctionalRequirements.getTaggedValueDefinitions().getTaggedValueDefinitionByName("source").equals(tag.getTagDefinition())) {
    tag.setValue("Marketing");
  } else if (typeFunctionalRequirements.getTaggedValueDefinitions().getTaggedValueDefinitionByName("text").equals(tag.getTagDefinition())) {
    tag.setValue("Load");
  } else if (typeFunctionalRequirements.getTaggedValueDefinitions().getTaggedValueDefinitionByName("verifyMethod").equals(tag.getTagDefinition())) {
    tag.setValue("Test");
  } else if (typeFunctionalRequirements.getTaggedValueDefinitions().getTaggedValueDefinitionByName("risk").equals(tag.getTagDefinition())) {
    tag.setValue("Low");
  }
}
Establish Parent & Child Relationships between Requirements
When requirement models are ready we can then establish the parent & child relationships them. We can use the addChild method to establish the relationships.
// Add Load, EcoFriendliness, Performance & Ergonomics as the children of requirement HybridSUV
reqHybridSUV.addChild(reqLoad);
reqHybridSUV.addChild(reqEcoFriendliness);
reqHybridSUV.addChild(reqPerformance);
reqHybridSUV.addChild(reqErgonomics);
Visualize Requirements into Diagram
Now all models are ready and we can visualize them into diagram. The requirement shape can be create using the DiagramManager.createDiagramElement method. Once it being created we then set its location and dimension using setBounds method. For some of the requirements we don’t want to show its properties we can use the setShowAttributes method to hide them away. Finally we call the resetCaption method to make sure its caption will correctly rendered on the diagram.
// Create shapes for requirements
IRequirementUIModel reqPowerShape = (IRequirementUIModel) diagramManager.createDiagramElement(reqDiagram, reqPower);
reqPowerShape.setBounds(1195, 442, 97, 40);
// Hide out the attributes
// Default (follow diagram setting) = 0
// Show all attributes = 1
// Show non-empty only = 2
// Hide all = 3
reqPowerShape.setShowAttributes(3);
reqPowerShape.resetCaption();
Create Containment Connector
Next we create the final components in our diagram, which are the containment connector. They can be create using the DiagramManager.createConnector method. Since the containment connector is just a visual presentation of the parent & child relationship, the connector itself didn’t have the underlying model element supporting it. Therefore when creating the connector we need to use IRequirementDiagramUIModel.SHAPETYPE_CONTAINMENT its type.
// Create containment relationships
diagramManager.createConnector(reqDiagram, IRequirementDiagramUIModel.SHAPETYPE_CONTAINMENT, reqHybridSUVShape, reqLoadShape, new Point[] {new Point(630, 105), new Point(630, 165), new Point(329, 165), new Point(329, 220)});
Show Diagram
Finally we show up the diagram.
// Show up the diagram
diagramManager.openDiagram(reqDiagram);
Sample Plugin
The sample plugin demonstrate how to create requirement diagram using Open API. After you deploy the plugin into Visual Paradigm you can then click the plugin button in the application toolbar to trigger it.
Download Sample Plugin
You can download the source code of this sample plugin from GitHub.
Related Know-how |
Related Link |


Leave a Reply
Want to join the discussion?Feel free to contribute!