

User Story scenarios
User story is one of the very important component for users who capture requirements with Visual Paradigm. Each user story features a set of properties for you to describe the different aspect of a user problem or requirement. A property is called scenario. Each scenario involves a set of steps, recording the preferred system behavior in accomplishing that specific user story.
By default Doc. Composer comes with a Details template that can output the properties of a user story, which include also the scenario of user story. It works pretty well but sometimes, you may want to do some customization for the output. In that case you may need to write your own template in outputting user stories’ scenario. In this article we will show you how to output the scenarios of a user story.
Sample code
<?xml version="1.0" encoding="UTF-8"?>
<ElementBaseInitiationBlock>
  <Property property="name" style="@heading+"/>
  <ParagraphBreak/>

  <ForEach property="scenarios">
    <Property property="name" style="@heading+"/>
    <TableBlock colWidths="40, 30, 30" tableStyle="Scenario">
      <TableRow>
        <TableCell>
          <Text>Steps</Text>
        </TableCell>
        <TableCell>
          <Text>Procedures</Text>
        </TableCell>
        <TableCell>
          <Text>Expected Results</Text>
        </TableCell>
      </TableRow>
      <FlowOfEventIterationBlock includeSteps="true" includeExtensions="false">
        <TableRow>
          <TableCell>
            <FlowOfEventIndent/>
            <Property property="index" foreColor="#848284" />
            <Text> </Text>
            <ValueChecker property="type" operator="not equals" value="">
              <ValueChecker property="type" operator="not equals" value="system">
                <Property property="type" foreColor="#00B200"/>
              </ValueChecker>
              <ValueChecker property="type" operator="equals" value="system">
                <Property property="type" foreColor="#CA6400"/>
              </ValueChecker>
              <Text> </Text>
            </ValueChecker>
            <Property property="name"/>
          </TableCell>
          <TableCell>
            <ValueChecker property="procedure" operator="not equals" value="">
              <Property property="procedure"/>
            </ValueChecker>
          </TableCell>
          <TableCell>
            <ValueChecker property="expectedResults" operator="not equals" value="">
              <Property property="expectedResults"/>
            </ValueChecker>
          </TableCell>
        </TableRow>
      </FlowOfEventIterationBlock>

      <HasFlowOfEvent  hasExtension="true">
        <TableRow>
          			<TableCell colspan="3"><Text>Extension:</Text></TableCell>
        </TableRow>
      </HasFlowOfEvent>

      <FlowOfEventIterationBlock includeSteps="false" includeExtensions="true">
        <TableRow>
          <TableCell>
            <FlowOfEventIndent/>
            <Property property="index" foreColor="#848284" />
            <Text> </Text>
            <ValueChecker property="type" operator="not equals" value="">
              <ValueChecker property="type" operator="not equals" value="system">
                <Property property="type" foreColor="#00B200"/>
              </ValueChecker>
              <ValueChecker property="type" operator="equals" value="system">
                <Property property="type" foreColor="#CA6400"/>
              </ValueChecker>
              <Text> </Text>
            </ValueChecker>
            <Property property="name"/>
          </TableCell>
          <TableCell>
            <ValueChecker property="procedure" operator="not equals" value="">
              <Property property="procedure"/>
            </ValueChecker>
          </TableCell>
          <TableCell>
            <ValueChecker property="expectedResults" operator="not equals" value="">
              <Property property="expectedResults"/>
            </ValueChecker>
          </TableCell>
        </TableRow>
      </FlowOfEventIterationBlock>
  	</TableBlock>
  </ForEach>

</ElementBaseInitiationBlock>
How to use the sample code?
We need a sample project to show you how the sample code works. The sample project bundled with Visual Paradigm is a good choice. Please follow the steps below to create a template with the sample code. An explanation of code will be given in the next section.
- Select Window > Start Page from the application toolbar.
- Click on Learn more for Sample Projects.

Clicking ‘Learn more’
- Click on Open below Online Learning.
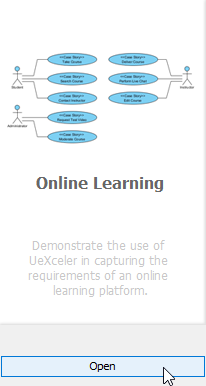
Open a sample project
- Open Doc. Composer by selecting Tools > Doc. Composer from the application toolbar.
- Select Build Doc from Scratch.

Select Build from Scratch
- Open Model Explorer and select any user story.
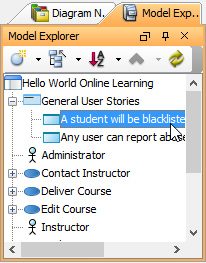
Selecting a user story
- Right click on any template listed in the Template pane and select Duplicate… from the popup menu.
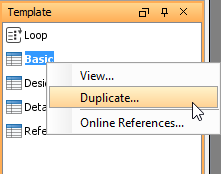
Duplicate template
- In the Edit Template window, enter All Scenarios as the name of template.
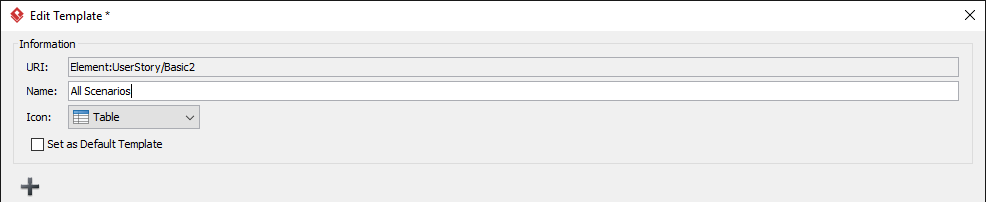
Entered template name
- Replace the template code with the sample code provided in the previous section.
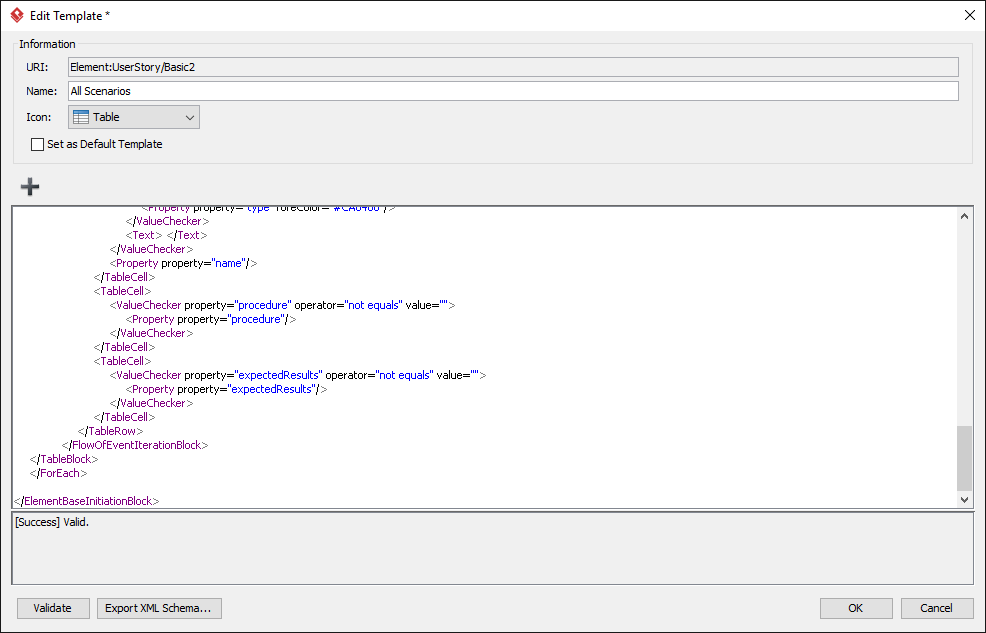
Template code pasted
- Click OK.
- In Model Explorer, look for the user story An instructor can create new course under the use case Deliver Course. Then, drag the template All Scenarios from the Template pane onto the document. You should see two sets of scenarios, which looks like the one below.
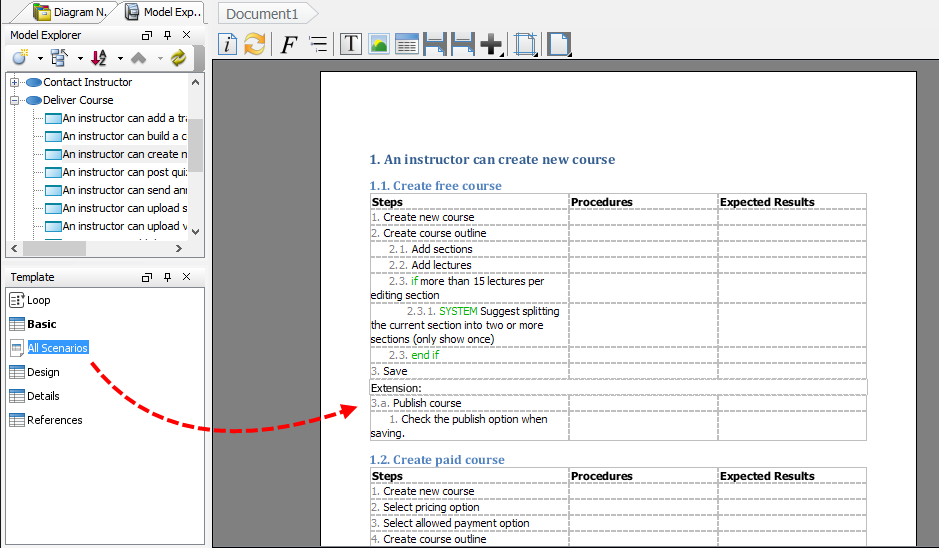
Dragging template to document
Explanation of sample code
The template can be divided into two main parts. The first part involves a loop that loop through all the scenarios of a user story. For each scenario, form a table that contains the steps of scenario as well as the steps written in the extensions section (if any).
Take a look at the first part first:
<ForEach property="scenarios">
This is responsible for retrieving all scenarios of a user story. The value of property is scenario.
Now, take a look at the code for outputting the rows of steps:
<FlowOfEventIterationBlock includeSteps="true" includeExtensions="false">
  <TableRow>
    <TableCell>
      <FlowOfEventIndent/>
      <Property property="index" foreColor="#848284" />
      <Text> </Text>
      <ValueChecker property="type" operator="not equals" value="">
        <ValueChecker property="type" operator="not equals" value="system">
          <Property property="type" foreColor="#00B200"/>
        </ValueChecker>
        <ValueChecker property="type" operator="equals" value="system">
          <Property property="type" foreColor="#CA6400"/>
        </ValueChecker>
        <Text> </Text>
      </ValueChecker>
      <Property property="name"/>
    </TableCell>
    <TableCell>
      <ValueChecker property="procedure" operator="not equals" value="">
        <Property property="procedure"/>
      </ValueChecker>
    </TableCell>
    <TableCell>
      <ValueChecker property="expectedResults" operator="not equals" value="">
        <Property property="expectedResults"/>
      </ValueChecker>
    </TableCell>
  </TableRow>
</FlowOfEventIterationBlock>
The steps of a scenario can be retrieved by using . Steps in main flow and extended flow (written in the Extension section) can be optionally included or extended by specifying true/false for @includeSteps and/or @includeExtension. We will talk more about this below.
In this example, a table row is created for each scenario step. Here are some points to note when dealing with a step:
- You can use to add an indentation to the document, for represented nested steps. The level of indentation is controlled by Doc. Composer engine. The deeper the level, the more level of indentation.
- You might have used controls like if, SYSTEM, loop, else-if in your step. Those can be retrieved by using a with @property=”type”. In this example we try to apply green as the font color of the word system, if the step is a system response.
- The text of step can be retrieved by using with @property=”name”
- You may also retrieve the procedures and expected results by using with @property=”procedure” and @property=”expectedResults”, respectively.
After creating table rows for all the scenario steps in the main flow, we move on to creating rows for steps in extended flow. Before we output the rows, we want to make a checking to see if there has any steps written in extended flow. If yes, add a row with text “Extension”. To do this, the following code is used:
<HasFlowOfEvent  hasExtension="true">
  <TableRow>
          <TableCell colspan="3"><Text>Extension:</Text></TableCell>
  </TableRow>
</HasFlowOfEvent>
is used to find out if the querying scenario contains any extension.
Also note the usage of @colspan in . It works like @colspan of a
(table cell) in HTML. You can use @colspan to specify the number of additional column to be ‘occupied’ by this cell, within the row.
After the checking, we appended table rows for each steps in extended flow. The following code is used for retrieving the steps in extension:
<FlowOfEventIterationBlock includeSteps="false" includeExtensions="true">
You can compare this with the one used earlier. For this one, we excluded those steps in the main flow by specifying @includeSteps=”false” (The ‘Steps’ here means steps in main flow) and included the steps in extended flow by specifying @includeExtensions=”true”.
Leave a Reply
Want to join the discussion?Feel free to contribute!