

Control diagram preview image in Doc. Composer using Open API
The Doc. Composer allows you to create document for your model in a fully customized way. For diagrams presented on a Doc. Composer, instead of showing the entire diagram you may want to have it focused on a specific part of a diagram. Instead of adjust the zoom ratio and scroll position manually in Doc. Composer, you can also do it with the Open API. In this article we will show you how to make use of Open API to adjust the zoom ratio and scroll position of the diagram image in Doc. Composer.
Introduction
In our example we will make use of a project with a simple Use Case diagram and a Doc. Composer which already have the image of use case diagram on it (bundled in the sample below).
Retrieve diagrams from project
We first have to retrieve the use case diagram and Doc. Composer from current opening project.
IProject lProject = ApplicationManager.instance().getProjectManager().getProject();
IUseCaseDiagramUIModel lUCD = null;
IReportDiagramUIModel lReportDiagram = null;
for (IDiagramUIModel lDiagram : lProject.toDiagramArray()) {
  if (lDiagram instanceof IReportDiagramUIModel) {
    lReportDiagram = (IReportDiagramUIModel) lDiagram;
  }
  else if (lDiagram instanceof IUseCaseDiagramUIModel) {
    lUCD = (IUseCaseDiagramUIModel) lDiagram;
Once we obtained the use case diagram we can then calculate the bounds on the target diagram which we want to display.
Calculate the bounds for zooming and scrolling the diagram
Let’s say we want to zoom the image to just include the use cases Main and Sub:
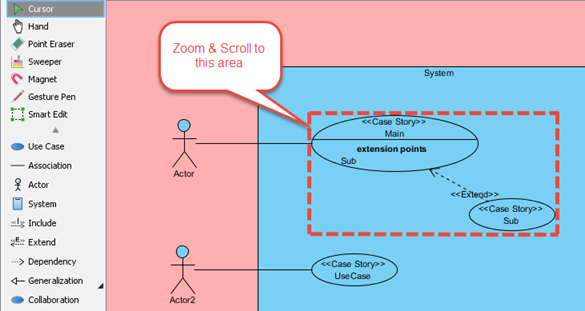
The diagram which we would like to zoom and scroll to
for (IShapeUIModel lShape : lUCD.toShapeUIModelArray()) {
  if (lShape.getModelElement() instanceof IUseCase) {
    if ("Main".equals(lShape.getModelElement().getNickname()))
      lX1 = lShape.getX(); // calculate the top left position
      lY1 = lShape.getY();
    } else if ("Sub".equals(lShape.getModelElement().getNickname())) {
      lX2 = lShape.getX()+lShape.getWidth(); // calculate the bottom right position
      lY2 = lShape.getY()+lShape.getHeight();
    }
  }
  if (lMinX == null) {
    lMinX = lShape.getX();
  } else {
    lMinX = Math.min(lShape.getX(), lMinX);
  }
  if (lMinY == null) {
    lMinY = lShape.getY();
  } else {
    lMinY = Math.min(lShape.getY(), lMinY);
  }
}
Rectangle lFocusedBounds = new Rectangle(lX1-lMinX, lY1-lMinY, lX2-lX1, lY2-lY1);
Next we add a small gap on the left and top side of the calculated bound.
// depends on different shapes showing on the diagram, there are different 'gap' showing on the diagram image.
lFocusedBounds.x += 15;
lFocusedBounds.y += 2;
After we obtain the bounds for zooming and scrolling the diagram image, we then move on to retrieve the diagram image object from Doc. Composer.
Retrieve the diagram image in Doc. Composer
To obtain the diagram image from Doc. Composer, we first have to obtain the ID of the use case diagram
// the id of the UCD, used to find out which image element in Doc. Composer is showing this Use case diagram.
String lUcdId = lUCD.getId();
Next we retrieve the detail elements from Doc. Composer. After that we talk through the detailed elements with a recursive function to obtain the actual diagram image element.
// get the 'Details' model element of the Report.
IReportDiagramDetails lDetails = (IReportDiagramDetails) lProject.getModelElementByAddress(lReportDiagram.getGenericXMLElementAddress());IModelElement[] lChildren = lDetails.toChildArray();
if (lChildren != null) {
  for (IModelElement lChild : lChildren) { // the contents of the document
    foundDiagramImage(lUcdId, lFocusedBounds, lChild);
  }
}
private void foundDiagramImage(String aUcdId, Rectangle aFocusedBounds, IModelElement aContent) {
  if (aContent instanceof IRDImage) {
    IRDImage lImage = (IRDImage) aContent;
    if (aUcdId.equals(lImage.getDiagramId())) { // found the use case diagram we looking for
      focusDiagramImage(aFocusedBounds, lImage);
    }
    return;
  } else {
    // try its children
    IModelElement[] lChildren = aContent.toChildArray();
    if (lChildren != null) {
      for (IModelElement lChild : lChildren) {
        foundDiagramImage(aUcdId, aFocusedBounds, lChild);
      }
    }
  }
}
Once we obtained the diagram image, we can then modify its zoom and scroll properties.
Perform the zoom and scroll
To adjust the scroll and zoom properties of the diagram image, we first have to obtain its current zoom ratio. After that change the zoom ratio back to 100%.
double lScale = lImage.getScale(); // scale to 100% (original should be 75%)
lScale = 1;
lImage.setScale(lScale);
Next we calculate the actual diagram width and height by using the zoom ratio, and calculate the offset for scrolling the diagram.
int lFocusedWidth = (int) (aFocusedBounds.width*lScale);
int lFocusedHeight = (int) (aFocusedBounds.height*lScale);
int lViewPositionX = aFocusedBounds.x*-1;
int lViewPositionY = aFocusedBounds.y*-1;
int lOriginalImageWidth = lImage.getImageBoundsWidth();
Now we set the viewing position of the diagram image, and adjust the width and height of the diagram image shape.
lImage.setViewPositionX(lViewPositionX);
lImage.setViewPositionY(lViewPositionY);
lImage.setImageBoundsWidth(lFocusedWidth);
lImage.setImageBoundsHeight(lFocusedHeight);
int lPageWidth = lOriginalImageWidth + (lImage.getImageBoundsX()*2) + 10;
/*10px border of the image*/
lImage.setImageBoundsX((lPageWidth-lFocusedWidth)/2);
Finally we open the Doc. Composer from project.
ApplicationManager.instance().getDiagramManager().openDiagram(lReportDiagram);
And you will see the Doc. Composer being show up with the diagram image scrolled and zoomed to the position we specified.

Resulting diagram image in Doc. Composer
Sample Plugin
The sample plugin attached in this article demonstrates how to adjust the scroll position and zoom ratio of the diagram image in Doc. Composer. After you deployed the plugin into Visual Paradigm, you can open the sample project attached in the plugin, then click on the plugin button in the application toolbar to trigger it.
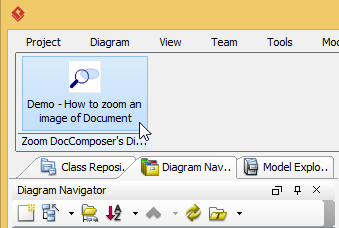
Trigger the sample plugin
Download Sample PluginYou can click this link to download the sample plugin. |
Related Know-how |
Related Links |
Leave a Reply
Want to join the discussion?Feel free to contribute!