

How to create Custom Ribbon using Plugin API
Visual Paradigm Plugin API allow users extend functionalities of the software by writing custom plugins. The custom plugins can be triggered from application toolbar, diagram or model element’s popup menu, or from diagram’s toolbar. For application toolbar by default the plugins will be grouped under the Plugins menu. In this article you will learn how to create custom ribbon in application for organizing your plugins.
The organization of plugins in VP application basically is independent to the implementation of the plugin. All are controlled by the plugin.xml. To achieve this you first need to create the root menu. In the menu setup you will require to specify its ID (the unique value that will be referenced by other menu item), label (name caption), as well as the ribbonPath. If you specify Tools in ribbon path then this custom ribbon will show after the Tools menu default in VP’s application.
<actionSets>
    <actionSet id="com.vp.plugin.sample.toolbarmenuexample.actionset1">
        <menu
                id="root"
                label="My Custom Features"
                ribbonPath="Tools"
                />
Next is we need to create 2nd menu for holding our custom features. For this menu we specify the ribbonPath as the root menu plus adding “/#” to it, means it is the first item under the root menu.
<menu
        id="feature1"
        label="Custom Feature 1"
        ribbonPath="root/#"
        />
Now we define the actions. For the first action it will have the ribbonPath based on the 2nd menu above, plus adding the “/#” to it.
<action
        id="trigger1"
        actionType="generalAction"
        label="Trigger 1"
        tooltip="Trigger 1"
        style="normal"
        ribbonPath="root/feature1/#">
    <actionController class="com.vp.plugin.sample.ToolbarMenuExampleActionControl"/>
</action>
And for second action it will have ribbonPath based on the first action followed by the ID of the first action, means it will follow the first action.
        <action
                id="trigger2"
                actionType="generalAction"
                label="Trigger 2"
                tooltip="Trigger 2"
                style="normal"
                ribbonPath="root/feature1/trigger1">
            <actionController class="com.vp.plugin.sample.toolbarmenuexample.ToolbarMenuExampleActionControl"/>
        </action>
    </actionSet>
</actionSets>
The result will be as below.
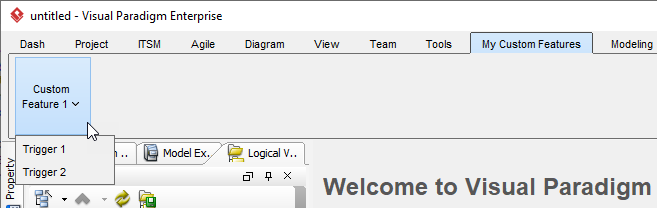
Custom ribbon & menu create using Plugin API
The following image illustrate the relationships between ID association on each items in plugin.xml.

Plugin XML vs actual result
Related Know-how |
Related Link |
Leave a Reply
Want to join the discussion?Feel free to contribute!