

Create iPhone Wireframe Using Open API
Wireframe is a very effective tool for develop screen mock-up. It’s simple and easy-to-draw nature allow developers quickly develop the screen design. This allow stakeholders foresee how the new system look like before you really develop it. This article will show you how to create a simple iPhone wireframe using Open API.
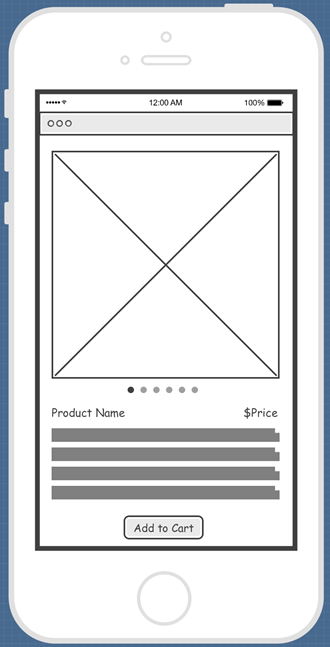
iPhone wireframe create with Open API
Create Blank Diagram
First we use DiagramManager.createDiagram to create a blank wireframe diagram.
// Create blank iPhone Wireframe diagram
DiagramManager diagramManager = ApplicationManager.instance().getDiagramManager();
IWFIPhoneDiagramUIModel iPhoneWireframeDiagram = (IWFIPhoneDiagramUIModel) diagramManager.createDiagram(IDiagramTypeConstants.DIAGRAM_TYPE_WFI_PHONE_DIAGRAM);
Create Root State
Once the diagram is created, we can create a state IWFDState of the wireframe as root state from IModelElementFactory.
// Create root state and set it to wireframe
IWFDState rootState = IModelElementFactory.instance().createWFDState();
iPhoneWireframeDiagram.setRootStateAddress(rootState.getAddress());
Create iPhone Shape
Next we create the iPhone shape IWFIPhone in diagram. By default it will be create in vertical orientation. Make sure we turn on the bounds, font, format and model properties for the iPhone shape for rendering.
// Create iPhone shape
IWFIPhone iphoneShape = IModelElementFactory.instance().createWFIPhone();
// Specify the wireframe widget got the bounds, font, format and model property
iphoneShape.setHasBounds(true);
iphoneShape.setHasFont(true);
iphoneShape.setHasFormat(true);
iphoneShape.setHasModel(true);
// Specify the dimension and coordiate of the wireframe widget
iphoneShape.setX(100);
iphoneShape.setY(100);
iphoneShape.setWidth(400);
iphoneShape.setHeight(800);
// Add the phone shape the root state
rootState.addElement(iphoneShape);
Create Top Panel
Once the phone shape is ready we can then put the UI widgets in the phone. We first create a panel IWFWebPanel (yes, we use the panel widget from web page wireframe) at the top of the screen.
// Create a panel at the top of the screen (using web wireframe component)
IWFWebPanel topPanel = IModelElementFactory.instance().createWFWebPanel();
topPanel.setHasBorder(true);
topPanel.setHasBounds(true);
topPanel.setHasFont(true);
topPanel.setHasFormat(true);
topPanel.setHasModel(true);
topPanel.setX(44);
topPanel.setY(135);
topPanel.setWidth(319);
topPanel.setHeight(30);
// Specify the phone shape as the parent of the panel
// and add it to root state
topPanel.setParentElement(iphoneShape.getId());
rootState.addElement(topPanel);
Create Images
Now we will create two images IWFIOSImage. Once is on the panel to represent a More Item button, and the other is at the center of the screen for showing the product image.
// Create more icon on the panel using image shape
IWFIOSImage moreImage = IModelElementFactory.instance().createWFIOSImage();
moreImage.setHasBounds(true);
moreImage.setHasFont(true);
moreImage.setHasFormat(true);
moreImage.setHasModel(true);
moreImage.setX(0);
moreImage.setY(-3);
moreImage.setWidth(53);
moreImage.setHeight(35);
// Using iOS more icon to represent the image
moreImage.setImageType(IWFIOSImage.IMAGE_TYPE_MORE);
moreImage.setParentElement(topPanel.getId());
rootState.addElement(moreImage);
Now you see how to create image element to wireframe, try it yourself to create the product image.
Create Page Control
We will have a page control IWFIOSPageControl below the image to present how many images are available for the product. For the page control element we can specify the page count to illustrate how many pages are available.
// Create page control below product image to represent multiple product images are available
IWFIOSPageControl pageControl = IModelElementFactory.instance().createWFIOSPageControl();
pageControl.setHasBounds(true);
pageControl.setHasFont(true);
pageControl.setHasFormat(true);
pageControl.setHasModel(true);
pageControl.setX(155);
pageControl.setY(479);
pageControl.setWidth(96);
pageControl.setHeight(9);
// Specify the number page available
pageControl.setPageCount(6);
pageControl.setParentElement(iphoneShape.getId());
rootState.addElement(pageControl);
Create Labels
We will create three labels IWFWebLabel in total, for product name, price and description. The product name and price are single line label, while the description is a multi-line label.
// Create single line label (using web wireframe component)
IWFWebLabel labelProductName = IModelElementFactory.instance().createWFWebLabel();
labelProductName.setHasBounds(true);
labelProductName.setHasFont(true);
labelProductName.setHasFormat(true);
labelProductName.setHasModel(true);
labelProductName.setX(60);
labelProductName.setY(499);
labelProductName.setWidth(250);
labelProductName.setHeight(20);
// Specify the font size
labelProductName.setFontSize(14);
labelProductName.setParentElement(iphoneShape.getId());
The label element itself didn’t contain the text item, and it is present by the IWFWebLabelInstance element. For single line caption we only need to add one IWFWebLabelInstance to the label. For multi-lines label we will need to associate multiple IWFWebLabelInstance to label, each representing one line.
// Create label instance for contain the actual text element
IWFWebLabelInstance labelProductNameInstance = IModelElementFactory.instance().createWFWebLabelInstance();
// Specify the text content. Otherwise it will automatically
// present with a gray color bar
labelProductNameInstance.setText("Product Name");
// Add the label instance to label
labelProductName.addInstance(labelProductNameInstance);
// Add label instance to root state
rootState.addElement(labelProductName);
Now let’s try to create the label for price information and product description.
Create Button
The last component in the wireframe is the Add to Cart button IWFIOSButton.
// Create the Add to Cart button
IWFIOSButton btnAddToCart = IModelElementFactory.instance().createWFIOSButton();
btnAddToCart.setHasBounds(true);
btnAddToCart.setHasFont(true);
btnAddToCart.setHasFormat(true);
btnAddToCart.setHasModel(true);
btnAddToCart.setX(150);
btnAddToCart.setY(640);
btnAddToCart.setWidth(100);
btnAddToCart.setHeight(30);
// Specify the caption of the button
btnAddToCart.setText("Add to Cart");
btnAddToCart.setParentElement(iphoneShape.getId());
rootState.addElement(btnAddToCart);
Show Diagram
Finally, open the diagram.
// Show up the diagram
diagramManager.openDiagram(iPhoneWireframeDiagram);
Sample Plugin
The sample plugin demonstrate how to create iPhone wireframe using Open API. After you deploy the plugin into Visual Paradigm you can then click the plugin button in the application toolbar to trigger it.

Trigger sample plugin
Download Sample Plugin
You can click this link to download the sample plugin.
Related Know-how |
Related Link |
Leave a Reply
Want to join the discussion?Feel free to contribute!