

Create C4 Component Diagram Using the Plugin API
A C4 Component Diagram is the third level of the C4 Model – detailing the internal structure of a single container by outlining its key components, their roles, and how interact. It sits between the border Container Diagram and the more detail Code/Class level. In Visual Paradigm, you can create the C4 Component Diagram directly from the diagram editor or through the Plugin API. This article explains how to generate it programmatically using the Plugin API.
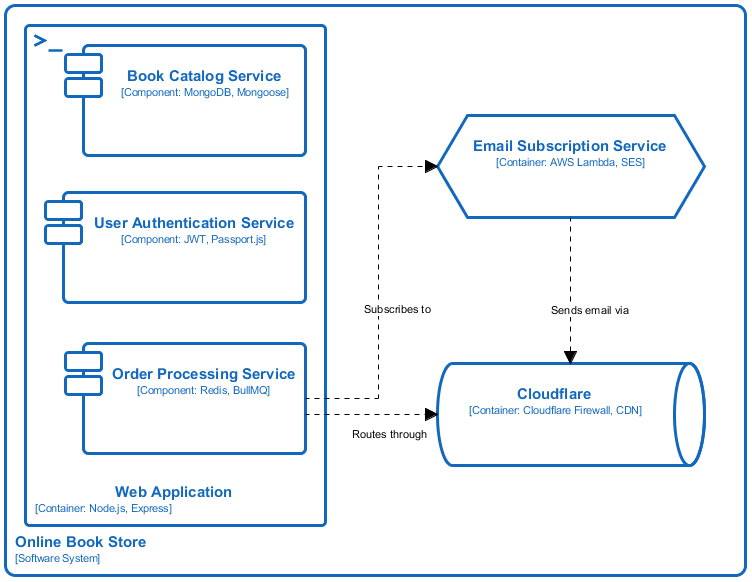
The C4 Component Diagram will be created by the plugin
Create a Blank Diagram
Begin by using DiagramManager.createDiagram with IDiagramTypeConstants.DIAGRAM_TYPE_C4_MODEL_COMPONENT_DIAGRAM to create a blank C4 Component Diagram. This initializes the workspace where all model elements and relationships will be added.
 // Create blank C4 Component Diagram
DiagramManager diagramManager = ApplicationManager.instance().getDiagramManager();
IC4ModelComponentDiagramUIModel diagram = (IC4ModelComponentDiagramUIModel) diagramManager.createDiagram(IDiagramTypeConstants.DIAGRAM_TYPE_C4_MODEL_COMPONENT_DIAGRAM);
diagram.setName("Online Book Store - Component Diagram");
Create a C4 System Software
After the diagram is created, you can create a C4 System Software element by using IModelElementFactory.createC4modelSoftwareSystem method.
 // Create C4 System Software model element
IC4modelSoftwareSystem onlineBookStore = IModelElementFactory.instance().createC4modelSoftwareSystem();
onlineBookStore.setName("Online Book Store");
Once the model element is instantiated, call DiagramManager.createDiagramElement to create its corresponding view so that it appears visually on the diagram.
 // Create shape for C4 Software System
IC4modelSoftwareSystemUIModel onlineBookStoreShape = (IC4modelSoftwareSystemUIModel) diagramManager.createDiagramElement(diagram, onlineBookStore);
onlineBookStoreShape.setBounds(100, 50, 740, 570);
// Set to automatic calculate the initial caption position
onlineBookStoreShape.setRequestResetCaption(true);
Create C4 Container
You can using IModelElementFactory.createC4modelContainer to create a container model element.
 // Create C4 Container model element
IC4modelContainer webApp = IModelElementFactory.instance().createC4modelContainer();
webApp.setName("Web Application");
// Specify technology property
webApp.setTechnology("Node.js, Express");
Once it being created you can then set its container type.
 // Set it as UI Container type
webApp.setContainerType(IC4modelContainer.CONTAINER_TYPE_BACKEND_CONTAINER);
After the element is created, use the DiagramManager.createDiagramElement to place its view onto into the diagram.
 // Create shape for C4 UI Container
IC4modelContainerUIModel webAppshape = (IC4modelContainerUIModel) diagramManager.createDiagramElement(diagram, webApp);
webAppshape.setBounds(120, 70, 300, 500);
Since the UI Container is contained by the System Software, we have to add both its model and views to the System Container to enforce the model structure.
 // Add it as child of Online Book Store System Model
onlineBookStore.addChild(webApp);
onlineBookStoreShape.addChild(webAppshape);
Create Other Components
You can create other containers using similar steps mentioned above. By specify different container type the element will automatically render in the correct container shape.
Create C4 Components
You can using IModelElementFactory.createC4modelComponent to create a component model element.
 // Create C4 Component model element
IC4modelComponent bookCatalogService = IModelElementFactory.instance().createC4modelComponent();
bookCatalogService.setName("Book Catalog Service");
// Specify technology property
bookCatalogService.setTechnology("MongoDB, Mongoose");
After the element is created, use the DiagramManager.createDiagramElement to place its view onto into the diagram.
 // Create shape for C4 Component
IC4modelComponentUIModel bookCatalogServiceShape = (IC4modelComponentUIModel) diagramManager.createDiagramElement(diagram, bookCatalogService);
bookCatalogServiceShape.setBounds(160, 90, 240, 110);
Since the component is contained by the Web Application container, we have to add both its model and views to the Web Application Container to enforce the model structure.
 // Add it as child of Web Application
webApp.addChild(bookCatalogService);
webAppshape.addChild(bookCatalogServiceShape);
Create Relationships
With the key elements in place, you can proceed to define how they interact. In a C4 Component Diagram, relationships are represented using the IC4ModelRelationship model type. You begin by creating the relationship model through IModelElementFactory.createC4modelRelationship, specifying the source and target elements.
 // Create relationship model between Customer and Web Application
IC4modelRelationship relOrderProcessingEmailSubscription = IModelElementFactory.instance().createC4modelRelationship();
relOrderProcessingEmailSubscription.setName("Subscribes to");
relOrderProcessingEmailSubscription.setFrom(orderProcessingService);
relOrderProcessingEmailSubscription.setTo(emailSubscriptionService);
Once the relationship model is ready, use DiagramManager.createConnector to create its visual representation on the diagram, completing the contextual connections between elements.
 // Create connector shape for the relationship between Customer and Web Application, and specify it's turning points.
IC4modelRelationshipUIModel relOrderProcessingEmailSubscriptionShape = (IC4modelRelationshipUIModel) diagramManager.createConnector(diagram, relOrderProcessingEmailSubscription, orderProcessingServiceShape, emailSubscriptionServiceShape, new Point[] {new Point(400, 443), new Point(473, 443), new Point(473, 211), new Point(532, 211)});
relOrderProcessingEmailSubscriptionShape.resetCaption();
Show the Diagram
After all elements and relationships have been added, open the diagram to display it within Visual Paradigm.
// Show up the diagram
diagramManager.openDiagram(diagram);
Sample Plugin
A sample plugin is available that demonstrates the complete process of creating a C4 Container Diagram using the Plugin API. After deploying the plugin into Visual Paradigm, you can click the plugin button in the application toolbar to run it.
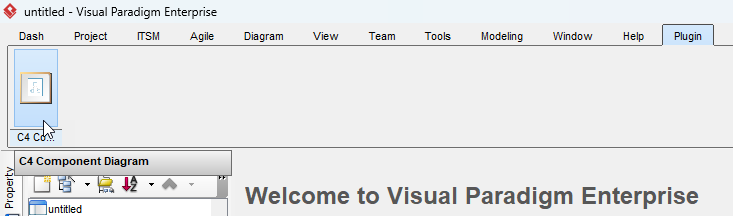
Trigger the C4 Component Diagram Plugin
Download Sample Plugin
You can click the link to download the sample plugin from GitHub.
Related Know-how |
Related Link |
Leave a Reply
Want to join the discussion?Feel free to contribute!