

Creating document with Doc. Composer using Open API
The Doc. Composer allows you to create document for your model in a fully customized way. You can customize the layout of your document by simply modifying the XML templates and specify what’s inside your document by drag & drop the templates into it, just like creating a diagram. But the drag & drop is a manual process, which you need to do it every time when you want to create a new document. Also after adding new contents, you will need to update it manually by adding the new elements into your existing document. In this article, we will show you how you can make use of the Open API to construct a document in a programmatic way, which can save you a lots of time.
Creating Doc. Composer
The Doc. Composer behaves as a kind of diagram, where you can create by calling DiagramManager.createDiagram, just like creating other diagram types.
DiagramManager lDiagramManager = ApplicationManager.instance().getDiagramManager();
IReportDiagramUIModel lReportDiagram = (IReportDiagramUIModel) lDiagramManager.createDiagram(IDiagramTypeConstants.DIAGRAM_TYPE_REPORT_DIAGRAM);
Prepare the IReportDiagramDetailsContainer and IReportDiagramDetails
All the details inside the document should be contained in the IReportDiagramDetailsContainer, which should only have one instance in your project. If the IReportDiagramDetailsContainer is already being created, we then simply reuse it, otherwise we will create a new one.
IReportDiagramDetailsContainer lContainer;
IProject lProject = ApplicationManager.instance().getProjectManager().getProject();
Iterator lIter = lProject.modelElementIterator(
IModelElementFactory.MODEL_TYPE_REPORT_DIAGRAM_DETAILS_CONTAINER);
if (lIter.hasNext()) {
  lContainer = (IReportDiagramDetailsContainer) lIter.next();
} else {
  lContainer = IModelElementFactory.instance().createReportDiagramDetailsContainer();
}
Once the IReportDiagramDetialsContainer is initialized, we can then create the IReportDiagramDetails from it. Each IReportDiagramDetails holds the models for one Doc. Composer Diagram in your project.
IReportDiagramDetails lReportDiagramDetails;
lReportDiagramDetails = lContainer.createReportDiagramDetails();
Finally we have to specify the address of the IReportDiagramDetails into IReportDiagramUIModel so that the Report Diagram can know where it should looks for the content.
lReportDiagram.setGenericXMLElementAddress(lReportDiagramDetails.getAddress());
Feeding contents into the document
Suppose we would like to construct a simple document just for the use case diagram, first we have to retrieve the use case diagrams from the project.
IUseCaseDiagramUIModel[] lUseCaseDiagrams;
{
  Collection<IUseCaseDiagramUIModel> lCollection = new ArrayList<IUseCaseDiagramUIModel>();
  IProject lProject = ApplicationManager.instance().getProjectManager().getProject();
  IDiagramUIModel[] lDiagrams = lProject.toDiagramArray();
  if (lDiagrams != null) {for (IDiagramUIModel lDiagram : lDiagrams) {
    if (lDiagram instanceof IUseCaseDiagramUIModel) {
      lCollection.add((IUseCaseDiagramUIModel) lDiagram);
    }
  }
}
lUseCaseDiagrams = lCollection.toArray(new IUseCaseDiagramUIModel[lCollection.size()]);
}
Next, we are going to feed in the content. We first create the diagram image. To do this, we have to create the IRDOOTemplate from the IReportDiagramDetails.
IRDOOTemplate lTemplate = lReportDiagramDetails.createRDOOTemplate();
Once the IRDOOTempalte is created, we then need to specify the XML template for it. We can use the setTemplateURI method to specify the XML template for IRDOOTemplate. The XML template defines how the information will be presented in the document. Each template have its own URI where you can find it by right click on the template and select View or Edit from popup menu.
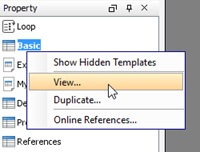
View detail of the template
After that you can find its unique URI in the template dialog.
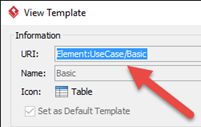
Obtain template’s URI
lTemplate.setTemplateURIL(""Element:UseCase/Details"");
Next we need to specify the source type. The source type (1) means this template is for a diagram, source type (2) means it is for a shape (diagram element), and the source type (3) means it is for a model element. Since now this template is for the diagram, therefore the source type should be “1”.
lTemplate.setSourceType(1);
After that we will have to specify the ID of the source element to the template, so that it know where should it looks for the details.
lTemplate.setSourceId(lUseCaseDiagram.getId());
Finally we will add the template into IReportDiagramDetails.
lReportDiagramDetails.addTemplate(lTemplate);
Now let’s try add the details of the use case into the document.
IDiagramElement[] lUseCases = lUseCaseDiagram.toDiagramElementArray(
IUseCaseDiagramUIModel.SHAPETYPE_USE_CASE);
if (lUseCases != null) {
  for (IDiagramElement lUseCase : lUseCases) {
    // UseCase
    {
      // UseCase.BasicInformation
      IRDOOTemplate lTemplate = lReportDiagramDetails.createRDOOTemplate();
      lTemplate.setTemplateURI("Element:UseCase/Details");
      lTemplate.setSourceType(3); // 3 for ModelElement
      lTemplate.setSourceId(lUseCase.getModelElement().getAddress());
      lReportDiagramDetails.addTemplate(lTemplate);
    }
  }
}
Show up the document
Once everything is done, we can then show it up by calling IDiagramManager.openDiagram(IReportDiagram).
Sample Plugin
The sample plugin attached in this article demonstrates how you can create the document for the use case diagrams in your project. After you deployed the plugin into Visual Paradigm, you can then click on the plugin button in the application toolbar to trigger it. Since this plugin is for creating document on use case diagram, you will need to create a use case diagrams with couple of use cases in order to try out the document.
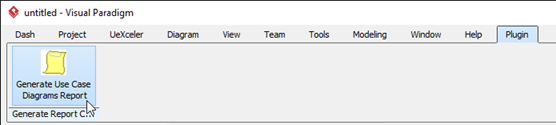
Trigger sample plugin
Download Sample Plugin |
|
Related Articles |
Related Links |
Leave a Reply
Want to join the discussion?Feel free to contribute!