

Setup VP Server with SQL Server
 VP Server is a server application which included the Teamwork Server, Floating License Server and Update Server. Instead of setup these server applications one by one; they can be setup via the single VP Server package. VP Server using database for storing the settings and configurations, such as teamwork user account, history for check-in & check-out of project files, floating license status, etc. You can setup VP Server with an embedded database, or using some popular DBMS such as Microsoft SQL Server, MySQL, Oracle and PostgreSQL. This article will teach you how to setup a Microsoft SQL Server database for the VP Server. We will use the Microsoft SQL Server 2014 Express Edition to demonstrate how it works.
Create Database in SQL Server
We first start from create a database for VP Server in your SQL Server.
- Open the SQL Server Manager Studio from Start Menu.

Launch SQL Server Configuration Manager
- Connect to your SQL Server instance.
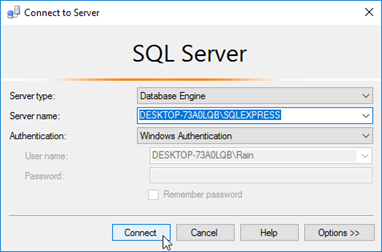
Connect to Server Instance
- Once you connected to the server instance, right click on the Databases tree node under Object Explorer and select New Database…
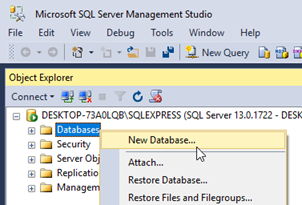
Create a New Database
- Name the database as vpserver.

Name the database as vpserver
- Choose the appropriate Collation for your database under Options section on the left in case your are using languages other than English.
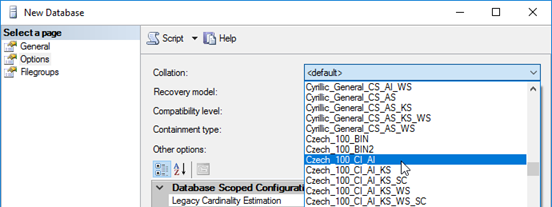
Select appropriate collation for the database
Now your database is ready and we can proceed to setup VP Server.
Setup VP Server with SQL Server Database
- Download the VP Server package from your or Customer Service Center account (only available for licensed customers).
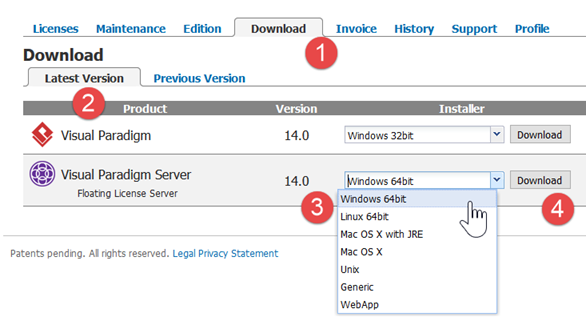
Download VP Server
- Unpack the VP Server package and execute the startup script inside the scripts folder.
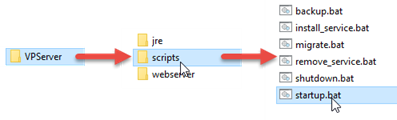
Launching VP Server
- Open a browser, and enter the IP address or host name of the server in URL with the port 1999.

Access to VP Server with browser
- Enter the Organization Name also the Administrator Password for the server. Hit the Next button to proceed.
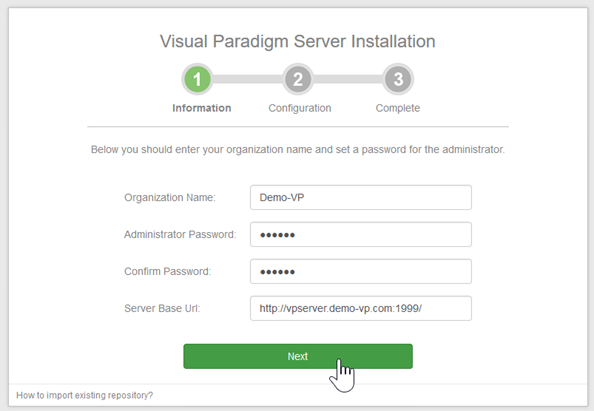
Specify company name and Admin password
- If you are installing for Teamwork Server then select Install Teamwork Module checkbox, otherwise if you only installing as Floating License Server then uncheck this checkbox and press Next to proceed.
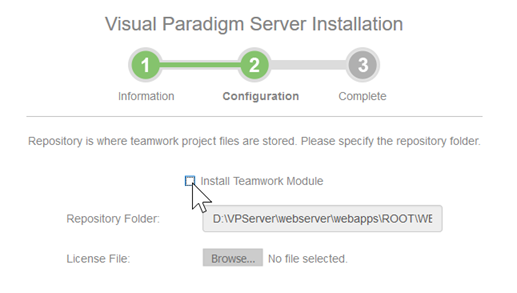
Turn on Install Teamwork Module if you are setting up for Teamwork Server, otherwise simply uncheck this option
- Select Microsoft SQL Server as the server database.
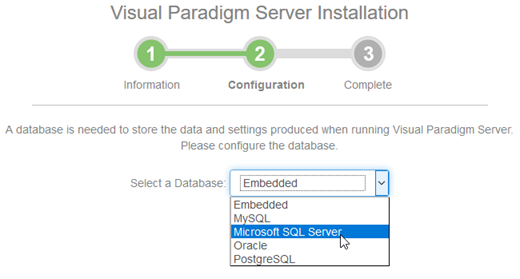
Select Microsoft SQL Server as the server database
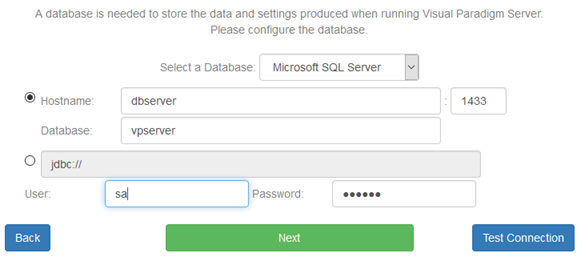
- Specify the database connection details.
For SQL Server Authentication or mixed authentication mode
Please enter the Hostname, port number, Database Name as well as the User name and Password.
Database configuration for SQL Server Authentication or mixed authentication mode
**Note that you ONLY NEED to specify the host name, or the IP address of the server hosting the SQL Server in the host name field. The server instance VP Server connected with is determined by the Port number. Don’t specify the name of server instance in the hostname field.
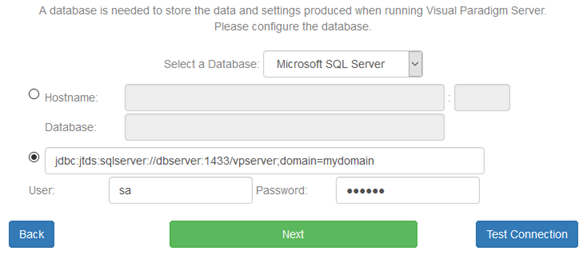
For Window Authentication
Select the connection URL, and enter jdbc:jtds:sqlserver://[<server_host>:<port>][/<database_name>];domain=XXX
Database configuration for Windows Authentication
** Replace the parameters with proper value.
** Domain Server is required. If no domain server is available, please leave the value for domain parameter as blank. - Once you specified the connection details, you can press the Test Connection button to see is it working.
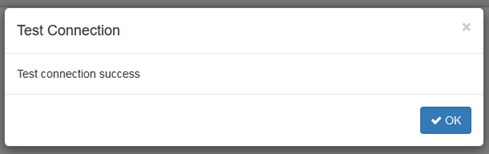
Test connection success
If the test connection is working, you can then press the Next button to move on, and follow the installation wizard to complete the configuration.
Related Know-how |
Related Links |
Leave a Reply
Want to join the discussion?Feel free to contribute!